Monday, February 29, 2016

Simon Says.....Happy Birthday!

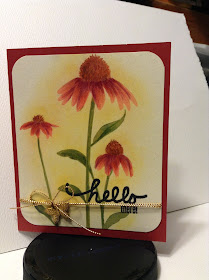
Here it is, the final card for the 30 day color challenge at The Daily Marker.  
I used Simon Says Stamp clear stamp set Artful Flowers SSS101488, and their Happy Birthday die.  The little birthday word is from W Plus 9 set Hand Lettered Hello.  The die is Spellbinders Curved Borders Two.

On white card stock, I stamped the flowers multiple times, masking as needed, with distress antique linen ink so I could do no-line coloring.  I used Copic markers to color the flowers. 

I layered the panel onto orange card stock.  I decided it needed something more, so I opened the card, and cut the front under the grouping with the dies.  Then I added a panel of vellum, attaching it to the front panel underneath.  I like the look that the vellum bottom gives the card.  It is difficult to photograph how it looks opened with just the vellum on the bottom.

I double cut and layered the Happy slight off so some of the orange shows under the white, then stamped birthday on another piece of vellum and attached that to a scrap of white card stock, and attached under the Happy.  A scattering of clear iridescent sequins finishes off the card.

Thank you for stopping by today.  I do hope you will check out the other entries and all the fun over at Kathy's blog at the link above.

This card is also for the 
and 

Thank you for stopping by today.  

Blessings,

lynda

Canvasette Card For Day 28 Color Challenge

A quick post to get day 28 uploaded to the website, as I finish up day 29 for the February 30 day color challenge at The Daily Marker
I created this card on canvasette paper, using Tombow markers.  I stamped the image in a light color (sorry, I can't remember the company, as it has been removed from the wood block and I did not label it).  I used the Tombow markers to color in the sections.  I thought it resembled oil painting, and kind of liked the look.  

It's a quick and easy card.  I added a strip of the canvasette paper along the side which I had run a stamp pad down, and a sticker for the verse.  Easy-peasy!

This is the pad of canvasette paper..... 
I will be back in a bit with day 29....the last card of the challenge.  I'm almost finished with it.

Blessings,

lynda


Sunday, February 28, 2016

Peaceful Robin Card

It was a simply lovely, warm day here today, so hubby and I went to lunch this afternoon and then to the beach and walked along the pier.  So many people were out, walking and enjoying the oddly spring-like weather at the end of February.  

Today's card was inspired by our outing.  The birds were chirping so loudly, the warm breeze felt so good, the sunlight was invigorating.  Ahhh, early hints of spring.  But, alas, we have March to get through.  So, in anticipation, here is my card for today.....
The stamps are Stampendous CRR158 Cling Nested Bird and SSC134 Sympathy clear stamps (I don't have the packaging so do not know the name of this one).  

I created a light watercolored background using the smoosh technique, then stamped the image and watercolored it.  After watercoloring, I went over the outlines with a dark brown fine point marker.  I stamped some Penny Black curlique stamps faintly along the borders.  The tag stitched die cut is from My Favorite Things.

This is for day 27 of The Daily Marker 30 day color challenge.  Also for the Simon Says Stamp Monday Challenge - Inspired by a song (Rockin' Robin by Bobby Day), and Simon Says Stamp Wednesday Challenge - Anything Goes .

Thank you for stopping in today.  I hope you got to enjoy some time with a loved one today.  

Be blessed,

lynda

Saturday, February 27, 2016

The Dog Did It - Tim Holtz Crazy Cats

What do you get when you have a friend over to stamp with you?  You get to use her new stamps, of course!  A true friend lets you use her stamps...even when she has not used them yet!  Thanks, Arlene!  
I stamped the cat on card stock, then used distress inks to paint him, using very little water so as not to pill the card stock.  I stamped and colored the milk bottle and yarn balls on a scrap piece of card stock, and cut them out.  It really does not show vey well in the pic, but the yarn and milk bottle are dimensional.  I used DAP Kwid Seal adhesive caulk instead of foam tape.  The caulk is easy to squeeze out of the tube, and stays dimensional when dry.  It is easier than cutting tiny pieces of foam tape for small objects.


I used white acrylic paint with Glossy Accents for the spilled milk and on the bottle.  The background is a Tim Holtz stencil, with distress ink sponged through.  For the floor, I just dragged the sponge tool across the card.  

The verse is done using letters form the Hero Arts Sparkle Clear:  Cute Letters.

We had so much fun playing with these stamps today!  I am sending this off to The Daily Marker Color Challenge Day 26.  I am a day behing.  I will post Day 27 and 28 tomorrow.  Hope you get to have some fun this weekend.

Blessings,

lynda

Thursday, February 25, 2016

Set of Three Cards - Day 25 Color Challenge

I had so much fun making today's card, that I decided to go ahead, since the dies and stamps were out, to make a couple more.  I like to do that, as it only takes a little more time to make more while everything is there and available.

This card is for The Daily Marker 30 Day Challenge Day 25! 

It is also for Penny Black At Allsorts - Anything goes with a stamp and a die , 
and Simon Says Stamp Wednesday Challenge - Anything Goes .
And 
this one didn't photograph well...the colors are really more intense
And
This last one is a shaker card.  I put the die on top of the acetate window.  

I added watercolor to a sheet of watercolor paper using Tim Holtz distress inks.  I used pieces of it on all three cards.  The die is from Penny Black, as are the stamps, from various sets of Penny Black clear stamps.  

And here are all three together....
Hope you enjoyed!  
Thank you for stopping in today.  

Blessings, 
lynda


Wednesday, February 24, 2016

Sending Love Card - Spring Leaves

It has been raining all day today, and the snow is melting.  Hooray!  I am thinking green, green, green.  I want to see leaves.  So I pulled out a couple of my favorite Hero Arts leaves for today's card....
I sponged Adirondack inks in lettuce and latte onto a textured card stock.  I wish I could remember where I had gotten the card stock, because I really like the way it looks and the way it takes ink.  I think I got it at either Michaels or Joanne Fabrics a while back.  The package says premium cardstock - canvas texture - pure white.  It contained 40 sheets.  The back says Nicole.

So...back to the card.  I stamped a script background (I believe that is also Hero Arts - I removed it from the wood block and neglected to write who it is) and some small leaves over the sponged background.  Then I taped the panel to my art board...aka cutting board... and sponged the same inks onto the panel, then stamped the leaves and background script stamp.  I love the white border created by the tape when I remove it.  I stamped a couple of extra leaves onto the same card stock, and fussy cut them, and also the verse Sending Love (by Penny Black).  

A fiber strip along the bottom, and some pearls and I called it finished.  

This is for The Daily Marker 30 day challenge day 24 , and also for Simon Says Stamp blog challenge - Inspired by a Song.  I was inspired the the song The Last Leaf by The Cascades.

Thanks for stopping by today.  

Blessings,

lynda

Tuesday, February 23, 2016

Our Daily Bread Designs Roses

With all the talk going on in the Stamping Enablers group on Facebook about Copics, Spectrum Noir, and the other brands of alcohol based markers, I was inspired to use my Copics today. 
I used Our Daily Bread Design stamp set H634 Fragrance, and Copic markers.  I used my Misti to stamp the flowers first in worn lipstick distress ink.  I colored the image with Copics R20, R24, R32, G21, G99, YG63, E33, E35, E37.  

After I colored the entire image, I placed my card back on the Misti and stamped over it again with the worn lipstick and peeled paint distress markers on the stamp.


Thanks for stopping by today.  

Blessings,

lynda


Monday, February 22, 2016

A Birthday Hello

This was one of those watercolor stampings that I came very close to, and almost pulled it off the board and threw it out.  It started out pretty, then took a turn I did not like.  I remember watching a video (can't remember who it was) where the artist was really not liking what was happening on her card panel, but decided to stick with it anyways, and in the end it turned out gorgeous and she was glad she had powered through.  

Well, that encouraged me to go ahead and finish mine, anyways, in spite of not liking where mine was going.  Can't say I am in love with it, but it turned out ok, and certainly much better than what I had originally thought.  Here's what I did....

I taped watercolor paper onto an acrylic cutting board I purchased just for watercoloring.  I like the art boards, but thought I would be resourceful and see what I could use instead of going to an art store or online.  I found a white acrylic cutting board 11 x 13 1/2 inches. It
is big enough for any projects I will be doing, and I love that it has a handle.  And, it is white, so I could rub my inks directly on it to use for water coloring.  I taped the card to the board using frog tape.
watercolor paper taped to my board

frog tape - someone once asked me what it was.  It is a low tack tape used for painting
I tape the watercolor paper down to keep it from warping when I use a lot of water.  I sprayed water on the card, and used a paint brush to add more water, making the card quite wet.  I had my palette on the side with ink (I smooshed TH inks onto my palette).  I used my brush to pick up colors and drop them onto the prepared paper.  The colors blended beautifully, and created a beautiful background.  I wanted the background to be faint, so I used a paper towel to pick up much of the paint.  This resulted in a very soft base for my stamping.

I used a Stampin Up set (Watercolor Garden) and another stamp set.  I do not know who makes the other set, as I only had the rubber without the wood.  The only information on the bag was SM1275 Warmest Wishes.  If anyone knows who this is, please let me know.

I used Tim Holtz distress inks in dusty concord, seedless preserves, wilted violet, milled lavender, twisted citron, lucky clover, blueprint sketch, faded jeans, frayed burlap, and scattered straw.  As I inked and stamped the flowers, I did not like, at all, what was happening.  The colors were too dark and did not look good on the soft background.  But, I kept inking and stamping anyways.  I used a paint brush to soften the petals and leaves, and change the images a little.  Then, I took a paper towel and blotted the entire card, and Viola!  That was the look I was going for, much softer.  It was salvageable, and I was glad I had not acted on my first impulse!

When the panel was dry (I hurried the process with my heat tool), I carefully peeled off the frog tape, which reveals a border the color of the watercolor paper.  I love the look of the painted area contained within that border.

The die and coordinating birthday verse is from W Plus 9.  I cut the die three times from eggplant card stock, and layered them on top of each other to give it dimension.

Now, it's time for dinner, and then perhaps some Zentangle.  I have to go to the dentist tomorrow for a crown, and am definitely not looking forward to that.  Gotta do something to keep my mind occupied.

This card is for The Daily Marker day 22 of the 30 day color challenge , and also for the Simon Says Stamp Monday Challenge - Inspired by a song.  I chose Wildflower by The JaneDear Girls.

May you find joy this week.

Blessings,

lynda


Sunday, February 21, 2016

Card and Gift Box Set

I had so much fun today.  After church I got into my 'house clothes' and after checking FB and emails, went right up to my craft room to work on some challenges.  Then the girls FaceTimed us from Buffalo, and Dan's brother came for the afternoon/evening.  I took a break to make meatballs and sausage balls and home made sauce, which is simmering and the smell is divine!!  Then it was back up to craft room to finish my project.

Today's project is for
Simon Says Stamp Monday Challenge - Recycle/Upscale Style , 
Hero Arts Challenge - Flowers,
Allsorts Challenge Week 351 - Birthday Wishes
The Daily Marker - 30 Day Color Challenge Day 21 .

Here is my gift set of card and gift box.....
I recycled/upcycled the box from a Kate Spade mug my daughter had given me as part of my Christmas gift.  Here is what it looked like before I altered it....


I really loved the box, and was going to save it.  But when I saw the Simon Says recycle challenge, I decided to sacrifice it.  I wanted to use all the colors in the box, including the yummy orange on the inside, and the gold on the lettering, and, of course, the in-your-face awesome pink in my altering components. 

I thought I would use flowers of some sort, so looked through my dies and stamps, and Voila!  I saw my Hero Arts stamp and die set E 657776.  I love this set, and have certainly gotten my money's worth of use from it.  It fit the bill perfectly, and I also could use it for the Hero Arts challenge.

The background on the card was stamped with Hero Arts CL106 Clear Design Fantastic Flourishes with Versamark ink. 

I stamped a bunch of the flowers in picked raspberry and ripe persimmon distress inks, and used the dies to cut them out.  I spread them out on my table, and used my low temp glue gun to attach them to the box.  I brought in the gold with some thin gold cording.  Sequins and beads finished off the sides and front, and I had just enough of that scrumptious orange satin ribbon, which I fashioned into a bow and secured to the top of the box with the glue gun.  I left the box top free so I could put a birthday gift inside.  

Corner view - sides and back not as embellished
Close-up of box


Close-up of card


Dinner is finished....it was YUMMY!!!  I finally have my blog post done, now downstairs for some time with my favorite brother-in-law and hubby.  All in all, it was a perfect Sunday.

Bless you,
     lynda

Saturday, February 20, 2016

Color Challenge Day 20 - Zentangle and Line Weaving

I was in the mood to work in my Zentangle journal today, and decided to enter this in the challenge for day 20 at The Daily Marker...


Here is the work before coloring....
I actually like the black and white better.  However, since this is a color challenge, I used my colored pencils to add color.  This one took me considerable time.  The tangle patterns were a little difficult to master, and I have lots of scrap paper sheets with my failures to show for it.  But once I got it figured out, I rather enjoyed it.  I love the challenge of learning new patterns.  

I will be back tomorrow with another stamping challenge I am working on tonight and will finish up after church tomorrow.  

Blessings,

lynda


Friday, February 19, 2016

Cone Flower Before and After - Color Challenge Day 19

Before.....well,sort of...keep reading.....
This Stampin' Up stamp was inked with TH distress inks and stamped onto a wheat colored panel.  I didn't get the idea to do a before and after until after I had mostly altered the first (largest) flower, and partially the second (on left) flower.  The small flower on the left bottom is unaltered.  

After stamping, I took four shades of colored pencil to touch-up the flowers, and two colors to touch-up the stems and leaves.  I just added shadows with the darkest, and blended out with the other colors.  It added much need dimension and depth to the composition, don't you think?  See the difference on the finished card.....
The background was done with pastels.  See previous posts for details on how to apply them.

Today is day 19 of The Daily Marker 30 day color challenge.  Be sure to stop in to check it out.  
Thanks for visiting me today.

TGIF.... hope you enjoy your weekend!

Be blessed,

lynda


Thursday, February 18, 2016

Art Journal Page - Make Every Day a Masterpiece

Sometimes ya just have to break all the rules and really get into your art.  That's the mood I was in today.  I started this art journal page several weeks ago, and put it aside because it seemed to need something.  Something about it was bothering me.  So, today I pulled it out and got messy with my art journal supplies.

The quote I had there was small and just didn't seem to fit.  So, I got crazy with my gesso and covered it all up and repainted over it.  Then, I found this stamp, and Voila!  That was what I was looking for.  I also added some color and stamps here and there that weren't on the original.

The stamps used on this page, with the exception of the verse, are all Magenta.  Lots of fussy-cutting, painting, and layering.  The background is gesso, and painted with TH distress inks.  

I do not do a lot of art journaling, but I really enjoy it when I do.  It is very freeing.  It's fun to just let go and see what happens.  Perhaps I don't do as much of it is because I'm just too lazy to deal with the mess afterwards.  But working on this got me wanting to play again.

This is my coloring for the day for the 30 Day Color Challenge at Our Daily Marker  day 18.  

Hope you are having a blessed day.

lynda

Wednesday, February 17, 2016

Every Day..... Color Challenge # 17

Today I decided to use some of my favorite stamps from years past, and some high-gloss paper.  When I had my rubber stamp shop, I had demo days every month.  Some of my favorite stamps to use, no matter what technique I was demoing, were the pear stamps from A Stamp In The Hand.  These are solid image stamps, and I just love using ink pads, markers, paints, you name it on these stamps.  It got so that if I didn't use it at one of my demos people were disappointed.  
Using glossy card stock and Adirondack inks, I inked up the stamps, placing color in different areas by using the edge of the ink pads.  Then I huffed (breathed hard) on the stamp, and stamped.  The lighter images are where I re-stamped without reinking the stamp.  Then I partially inked the pears background stamp (A Stamp In The Hand also) and stamped it here and there on the card.

I usually like to sponge a little color onto the background, but decided to keep this one a little cleaner and simpler.  I love this technique, and the way the inks really show up on the glossy card stock.  

The card is a white glossy card.  I inked the edges with a finger dauber tool using green ink pad to match the pear panel.  I cut the panel with a Spellbinders curved rectangular die.

The little pear charm is one of many charms I have left from when I closed my store.  I have resolved to start using some of the items I have stashed, rather than keep buying new 'stuff.'

This card is for The Daily Marker 30 day challenge, day 17. 

Off now to do some more Zentangles.  

Blessings,

lynda 


Tuesday, February 16, 2016

If Friends Were Flowers

We're not going anywhere today.....winter storm warnings.  The snow is falling...thick, wet, heavy snow.  Up to 24 inches today. So glad there is nowhere I have to be today!

It's day 16 of The Daily Marker 30 day color challenge.   This is my card for that, and also for some other challenges: 
 HERE at Impression-Obsession challenge blog.  The theme is Friends Forever.  
And HERE at Simon Says Stamp Wednesday Challenge.  The theme is One Layer Cards.
And HERE at Simply Less Is More.  The theme is one layer.
I used Impression-Obsessions CL-68 Spring Blooms and WP31 Borders sets for these cards.  I chose Marvy Matchables inks.  I like the really nice colors in these inks, and the smooth, dense pads.  They always stamp so nicely.  The Spring Blooms stamp set has 13 stamps, all spring related and flowers.  So pretty.  The Borders set is one of my favorites...an oldie but goodie.  It also has 13 border stamps...from slim lines to bold, squares in lines, circles in lines, scalloped lines, dotted lines, dashed lines, diamond lines, and more. They are long enough to go all the way from the top of the card to the bottom, with a couple of inches to spare!  Love 'em!

You'll notice I said cards above.  That's because I was having so much fun, I decided to make more cards with these sets while I had everything out.  I try to do that as often as I can.  So here are the rest of the cards.  I will box them up in a gift set for our church card ministry.
I used inks and TH blending tool on some of the backgrounds, and pastel chalks on others.  You can see my technique for using the chalk pastels on my previous post HERE. 

That's it....stay inside, stay warm and safe.

Blessings,

lynda


Monday, February 15, 2016

Wishing You Joy - Day 15 Color Challenge

Here we are, over the half way point for the color challenge at The Daily Marker .  Today's card uses stamps from Marion Smith Designs - MS101058 Garden Rose Stamp set, and Jillibean Soup by Hampton Arts - JB0198 Hand Written Sentiments.  I love the flowers in the Marion Smith set, and the different scripts and phrases in the Jillibean Soup set.  And here's the card.....drumroll.....
I embossed the flowers (masking the first before stamping the one on the left) with white powder.  My painting medium was Tim Holtz distress inks.  I applied water to each petal and leaf individually, then added the ink and let it blend naturally, then went back and added some darker color to distinguish the petals from each other and show shadow.  I inked the phrase with Memento brown ink.  The little net thingie is a small stamp that came with the set, so I inked it up and stamped it randomly while masking the flower images.

I get a lot of questions about my soft backgrounds.  I actually have two ways to do these.  One is with the TH inks and the round ink applicator tool.  I rub the tool into the ink pad, then off on scrap paper.  Then I start applying the ink to the borders of the card.  I actually start off of the card, working the tool in a circular motion, and bring it from my craft mat onto the card.  By then, the color is very soft.  I take my time with this, as too hard pressure or going too quickly makes splotches.  So, the key is very light pressure, starting off the page, and circular motions, building color up as desired.  
The second, and quickly becoming my favorite when I am using card stock (the ink blends better on watercolor paper than on card stock) is pastel chalks.  I love these little bars of smooth, chalky color.  This is what they look like...
To create the creamiest, softest backgrounds using these chalk pastels, I put a sheet of scrap paper next to my project and shave the chalk onto the paper, using a craft knife.  Just run the knife gently along the edge of the chalk and it will make tiny crumbs onto the paper.  I use square makeup pads folded into fourths.  I rub the pad into the chalk pile, and then off to the side, gently rubbing the chalk into the pad.  Then, I bring the pad to my project, and, using circular motion again, I rub the color onto the project with the pad.  Viola!  Smooth, creamy, soft color.  I use alligator clips with tiny and small pom-poms for the small in-between areas.  I get these from the craft stores.  I am not concerned with the color getting onto the stamped images, at it is usually pretty light, and doesn't show.  If I do use a dark color, I simply mask off the image first.  If I want a darker color I usually shave the chalk right onto the project where I want it and rub it in.  Here are my supplies for this....

I hope this is clear.  If you have any questions, leave me a comment and I will get back to you.  

This card is also going to a challenge at Simon Says Stamp Wednesday Challenge - one layer, and, of course, the color challenge at The Daily Marker .

If you would like to receive an email when I post to the blog, please sign up in the box at the top of the blog Follow by email.  You will then be notified when I have a new post.

Comments are always welcome and appreciated!  Thank you for stopping in.  I hope you find some time to create today, even if only for a few moments. 

Blessings,

lynda


Sunday, February 14, 2016

Watering The Posies Day 14 Color Challenge

This card was inspired by a desire NEED to feel warm and see color again, instead of a blanket of white, and before that dingy, bleak gray.  It's not my usual forte', but I had this set of stamps from Penny Black (30-025 Betsy Bluebell) that I had won on a challenge a couple of years ago, and thought I should use them again.  It's been a while since I had made some cards with them.  And the news this morning had a gardening segment, which I thought was cruel, so to satisfy my gardening desire, here is Betsy, happily watering her posies.....  
It's Day 14 of the color challenge at The Daily Marker ... that's two weeks.  Wow...it sure is going by quickly.  I always enjoy participating in this challenge, and especially love all the projects I have at the end of it!  Way to build up my card supply.

I also run the card ministry at our church, so we are always in need of cards to send to those in nursing homes, hospitals, and shut-ins.  And we have a rack in the church where parishioners can take a card or two, and leave a donation.  The money goes to pay for the postage to send the cards that we mail out.  Our card-making group meets once a month on a Saturday to make the cards.

So, now it's back to my room to finish a watercolor card that I'm working on for tomorrow's post, then to spend some time with the hubs.  I'm a little under the weather today, so looking forward to some mindless tv or some reading.  Or who knows, he may be in the mood to play Farkel.....fun game.  

Thanks for stopping in today.  Enjoy the rest of your weekend.  Hope to see you back here tomorrow.  

Blessings,

lynda    

**** If you would like email notifications each time I post a new blog post, please click on the Follow By Email button at the top of this blog.  Thank you.