But, though I've been sporadic for a couple of weeks, rest assured, I'm here to stay! And I'm missing my stamping and blogging BIG TIME!! I am looking forward to this coming weekend to play with some of the new stamps and dies I purchased at the rubber stamp show here in Rochester last week.
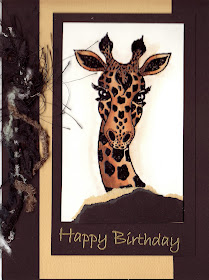
 For this week's technique, I'm pulling out a card I did for a class a few years ago at the store. This giraffe or any similar stamp is the perfect image for this deep coloring technique. To begin, stamp image onto good quality white or light card stock. Emboss with black. For the giraffe, I chose a very light shade of tan Tombow marker, and "colored" the entire giraffe with the lightest color. Working fairly quickly, I took the next darker shade, just a hint of brown, and added that shade, starting on the left side of the neck, face, and horns. I used a Dove blending marker to blend the two colors together where they meet. I continued on with the next darker color, and finally finished with the darkest shade of brown, using just a bit of it to show shading. After each color was added I went in with the Dove blender and blended the line where the two colors met.
 TIP: When finished coloring with markers, heat set slightly (not too much as you don't want to melt the embossing). This will "set" the color so that it doesn't continue bleeding into the fibers of the paper, causing it to fade.That's it!!!
 |
| Close-up of marker work |
Easy-peasy, right? The key is to not be afraid to use color and add the deep shades. That is where you will get the contrast that makes your image "pop!"
See you next week with one of my new stamps and another technique!
Blessings,
lynda
Gorgeous! I've never tried the Dove blender for marker coloring - always used the Tombow blender. Will have to compare the differences.
ReplyDeleteGorgeous! I've never used the Dove blender for marker coloring - just the Tombow blender. Will have to give this a try and compare the differences.
ReplyDelete