Unfortunately, the photograph of the card does not show the shimmer of the Perfect Pearls over the entire card. It's a soft, glowing shimmer, that's just so lovely. You'll just have to try one for yourself to really see the beauty of these little jars of pure shimmer!
Here's how to create shimmery backgrounds with Perfect Pearls, inks, and stipple brushes:
- Choose white or ivory card stock, and two or three ink pads in colors that blend well and look good together.
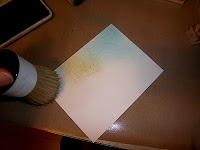
- Dab a stipple brush onto the first ink pad, and tap the color onto the card. Be sure to leave some areas open for the next color.
- Stipple the second color in the open spaces (and a third color if you like). I use a different stipple brush for each color. I have one for every color group (one for greens, one for pinks, one for blues, etc.)
- When you have the entire card stippled, you will have a background that looks as though it has been airbrushed. You can stop there, and stamp on the background and develop your card from there. OR, you can add the next step.
- Spritz the stippled background with a fine mist. Use a stipple brush to stipple a dusting of Perfect Pearls over the entire background. I just dipped the very tip of the brush in the pot, and tapped the pearls in the lid, then tapped into the lid a few times, then onto the card. The fine mist of water on the card stock will hold the pearls on the background.
That's it!
To finish my card, I stamped the script background and the flowers, then added the verse panel, ribbon, and pearls.

I use these really thick, full stipple brushes. They hold lots of color, and it goes on really smoothly. I used Adirondack inks on my card.
Tapping color from the stamp pads onto the card.
Fine mist spritz.
Smaller stipple brush to apply Perfect Pearls. I used gold pearls.
Try different color combinations when you create your backgrounds. Try different colors of Perfect Pearls. Experiment, and see what lovely backgrounds you can make!!
Thanks for stopping by.
Blessings and peace,
lynda


Love this post and pretty card, Lynda! Again, I've learned something new tonight. This may sound strange, but I've never heard of a stipple brush. As I was reading, I was hoping you had a photo and of course, being the wonderful teacher that you are, there it was! Thank you for always being so informative! Your card is really beautiful!
ReplyDeleteGreat technique tips. Love the background. I will have to try that too. Gorgeous.
ReplyDeleteI am going to try this as soon as time allows.YOURS IS AMAZING.
ReplyDeleteSo beautiful!
ReplyDeleteBeautiful card.........
ReplyDeleteWhat a pretty card - and I love the technique! Will have to try it!
ReplyDeleteGreat idea - I am just going to try it for myself. Thanks for sharing this technique.
ReplyDeleteJust beautiful....and the shimmer shows up in the enlarged version!
ReplyDeleteI have to try this. It looks wonderful. Thanks for sharing.
ReplyDeleteAgain, I love your work Lynda. I added you to my blog and I just signed up to follow you. i always get excited when I get new followers so maybe you can check out mine and follow me too. This blog-land is so fun and so much talent out there.
ReplyDeleteGreat technique and a beautiful card. I just became a follower and will look forward to more great things! Thank you so much for sharing with us.
ReplyDeletethanks for sharing the technique,
ReplyDeletewhy not check out the themes and enter in Created Byhand Tuesday Challenge?http://createdbyhandchallenge.wordpress.com/
Great technique! Love the soft glow on the card! Well done!
ReplyDeleteThats cool :)
ReplyDeleteVon
Wow, what a great idea. Thanks for sharing it.
ReplyDeleteFirst of all, I love the music. How do you add music to your blog? I think the techniques you are showing us are awesome. I didn't know what a stipple brush was either. I will have to get a few of those and try this technique. When you spray, what do you put in the spray bottle?
ReplyDeleteThanks, everyone, for your kind comments.
ReplyDeleteDEBI - I use Project Playlist - http://www.projectplaylist.com/ - directions on how to set it up are on the bottom of the page when you open the link, in the FAQ area. Create your playlist, then just add it as a gadget in your blog.
As far as the spray bottle, it's just plain old water.
Thank you so much for sharing this technique. Not only did you share how you did it, you gave step-by-step instructions. I love that and your card. I just have to try this out but first I have to go buy some brushes.
ReplyDeleteAgain, TFS