Tuesday, December 29, 2009

IR-RESIST-ABLE


It's Tuesday already, and I'm back with a resist technique using embossing and chalk inks.  On this card, the panel of flowers is the "technique" part.  So, let's get started with how to do it!

Start by embossing the image (in this instance, the row of flowers) with clear pigment ink.  I used VersaMark clear ink on white cardstock.  Apply clear embossing powder and heat until fully embossed. 
Next, begin applying ColorBox Chalk ink to the embossed strip, starting with the lightest color and working up to the darkest color.  I used the Chalk ink Queue (Cat's eye shaped pads) in graduated colors of pinks and deep burgundy. 


The last step is to buff the inked strip with a tissue or paper towel.  This will blend the colors, and clean the ink off the embossed image.  I usually use the tissue after each color, so the blending is smoother.  So, after I applied the lightest, then the next deeper color, I buffed with a tissue.  Then, when I added the third color, I buffed again, repeating this process until I applied the final color.  After all finished, I went back and "touched up" areas where the transition between some colors wasn't as smooth as I would have liked.  I just applied more of the two colors that were next to each other, and blended right away.

That's it.  Once you have your piece inked and buffed, you can use it on a card, scrapbook page, or any paper crafts project.  Here is the card assembly for the card I made with my strip:
-Prepare strip using the above method
-Emboss dot background with VersaMark and clear embossing powder on tan cardstock. Round corners.
-Stamp scalloped border on pink cardstock, attach to prepared (above) strip.  Attach to tan piece as shown. Tie ribbon at seam.  Attach piece to brown card.
 -Stamp For You scalloped circle and attach with foam tape to circle (punch or die cut circle).  Attach to card slightly overlapping strip.
-Stamp graduated dolls and apply to card. Use foam tape on medium and small doll.
That's it!  Easy, peasy!  And fun to do.

Stamps by Hero Arts:  S1583 Dot Background,  CL045 Flower Border (clear set), CL289 Dolls and scalloped border, and For you circle (clear set).

Blessings,
lynda
-

Tuesday, December 22, 2009

Merry Christmas!!

It's time for Technique Tuesday, and I'm still trying to get my Christmas decorating, shopping, baking, cards, and wrapping done!!  Christmas is three days away, and I'm nowhere near done.  But, I have decided I'm NOT going to stress about it.  I had a most wonderful month, celebrating my daughter and son-in-law's wedding, am blessed with a loving husband, a beautiful, lively and delightful granddaughter, and a family and friends I adore.  What more is there, really, when you come right down to it?! 

The lights are on the tree, the decorations will go up tonight, most of the gifts are at least purchased, and if I don't get to cookies, oh well.  Don't need the cholesterol anyways!   We are going to Buffalo on Thursday afternoon, to spend the evening with the kids and Keeley, go to Mass with them, and be there on Christmas morning to watch Keeley open her Santa gifts.  After brunch with the kids, we'll come home Christmas afternoon and spend the afternoon and evening at Dan's mom's, with his brothers and sister.

We're hoping to get together with some friends on Saturday, if our schedules all cooperate, and maybe get to spend a day just to ourselves on Sunday! 

As time seems to have gotten away from me, my Technique Tuesday posting this week is my Christmas card for this year.  I wish you, and yours, a very, very Merry Christmas, and a New Year of blessings!

Peace,

lynda

Wednesday, December 16, 2009

Technique Tuesday - Money holder cards

I know, I know.  I'm a day late with my Technique Tuesday.   You have to remember, I have had NO Christmas preparations done, as my whole focus these past couple of months has been the big wedding.  Now that it's over, and I've had a little time to recouperate, I have been getting down to the business of Christmas.  You have to understand, Christmas at our house is a BIG DEAL.  I LOVE Christmas.  I love everything about it.  The decorating, the baking, the tree, the songs, the joyful spirit of most folks.  We usually get things kicked off on Thanksgiving afternoon, when the kids come in and help us decorate our tree, then I putz with the rest during the following week.  So, imagine my distress at having NO Christmas decorations, tree, or anything in sight here until this week!!  I have been scrambling to get it all done, and still have LOTS to do, but need to get this post on the blog.


I love this project which is on the Hero Arts Club Blog.  There are directions, and a video, on how to make these cards, which each hold money.  If you are giving money as a gift, these cards are sure to bring a smile to the recipients' faces!  What unique ideas.  Here are a couple of the cards.  Check out the blog http://heroarts.com/blogs/club/2009/12/16/who-said-money-doesnt-grow-on-trees/ for detailed directions and video.


I trust you are enjoying your holiday preparations.  I looked out the window a few moments ago, and it's snowing very heavily here right now, and it looks so pretty.  Yes, we are going to have a white Christmas.

Thanks for all your good wishes for my daughter, Faith, and her husband, Dan, and Keeley.  They are doing great, and love being Mr. & Mrs.  

Blessings and peace to you.

lynda

Saturday, December 12, 2009

Wedding Accessories

I know, I promised some pics of the wedding accessories I made for my daughter, Faith's, wedding last week.  I'm finally back down on the ground, and enjoying a lovely Saturday at home, NOT making wedding things for the first time in a loooooong time.  But, I have to say, I loved every minute of it!

So, here goes.  Can't figure out this spacing thing....It looked good when I typed it, but when I pressed publish, all this spacing happened, and I don't know how to fix it.....so you need to scroll down a lot to see all the pictures...just keep scrolling to the very end.  There are nine pictures, then a final paragraph.  First, there were the shower invitations:

Our Rochester shower:                 


 Faith and me at Buffalo shower


Shower favors


Card box for wedding - poor picture, black satin and velvet flocking, flowers and feathers on top, with slot in front for inserting cards.  Thinking of going on Etsy to sell my card boxes and garters....by encouragement and "pushing" from said daughter....


the garter le elegance....


Oh, and one last picture....Faith in her dress on the day she bought it....BEFORE the wedding...stay tuned for actual wedding pictures FROM the wedding...to be posted when they are available.  She had some alterations made on the dress, which was gorgeous to start with....but made it even more "Faith-like" when done, and just stunning.  I think she was a stunning, gorgeous, and radiant bride....but then, I'm the mom!  They made such a perfect couple....and everything was so fun, so gorgeous, and so THEM!  


Well, that's it for this post.  As I said, I will post a link to pictures from the wedding as they become available.  You really have to see the alterations to this dress.

Thanks for bearing with me these past few weeks.  NOW, I really need to get some Christmas decorating done, not to mention cards to make!!!!!

Joy and blessings,

lynda


Tuesday, December 8, 2009

Today was a busy day, with a dental cleaning at 8 AM, Prayer Shawl Group from 10 until noon, then a tea party at my friend, Sylvia's.  I just sat down after dinner to check my emails, etc. from the weekend away (yesterday I went to bed shortly after work, catching up from all the partying), and thought about Technique Tuesday.  I'm making it easy on myself again this week, with this adorable card purse I found on Split Coast Stampers site.  It is a set of note cards and envelopes inside a sweet card purse, and is a creation of Jodi Collins.  I thought it was just so sweet, and just in time for holiday gift giving. Who couldn't use a few cards for sending out quick notes or thank you notes, especially this time of year.  What a thoughtful and perfect gift to make and give.  The directions are very clear, with pictures, and even a video, so you can see step by step how this is constructed.  I was thinking of all the occasions I would like to make these for....birthdays, Easter, even favors for a small party, and, of course, Christmas.  I know you will enjoy making some of these.  Here is the link to the tutorial with full directions by Jodi:

I survived my daughter's wedding Saturday, and am home enjoying the relative quiet and stress-free environment until the next big event!  It was an absolutely beautiful wedding, and Faith made a radiant bride, and Dan a very handsome groom.  We had so much fun, and enjoyed every moment.  It just ended too soon after all those preparations.  It seemed like a fairy tale that I didn't want to end!  I will post some pictures when they become available.  I posted the picture of the card box and garter that I made on my Flicker stream, and you can click on it to take you there (scroll down until you see my Flicker stream on the right).  I did notice some wedding pictures on Facebook, so if you look on my Facebook page, you can see what some of the girls have posted there.  Everyone was commenting how lovely everything was, and what a great time they all had.

I think it's going to take me a few days to catch up on the sleep I missed Saturday night from all the partying (can't handle it like I used to), but it was so worth it.

I will be back into the swing of things soon, and posting more often now that the wedding is over.  Now I have to start thinking Christmas!!!!!  I'm so far behind.  I know what I'll be doing this weekend!!

Ciao,
lynda


Tuesday, December 1, 2009

Technique Tuesday - Photo Tags

OK, so I'm making my blog posting easy on myself this week, as I can't seem to focus on much else but the wedding at this point.  Only four more days!!!!

So, today's blog post is about gift tags....more specifically, photo gift tags.  They are featured on today's Hero Arts blog, and they are just fabulous.  And, just in time for Christmas gift wrapping.  I will definitely be making some of these (after the wedding).  They are charming, pretty, and look easy to make.  Here's the link to the Hero Arts blog and the posting about these awesome gift tags:

http://heroarts.com/blogs/club/2009/12/01/picture-perfect-tags-plus-giveaway/

I've included some of the pictures here on my blog, but there are more on the Hero Arts blog, along with directions.                                                                                          And, be sure to sign up for the drawing for a free set of Hero Arts stamps while you are there.  It's free to sign up, and you just might win!                                                                                                That's it for today.  I hope you enjoy the Hero blog with the tags.  There is more coming in their blog tomorrow....more tags and ideas, so be sure to go back.  Better yet, if you haven't signed up yet, sign up for the Hero Arts blog.  You will be notified when they post each time.  There are some great ideas there, and every week there are giveaways, and a challenge each week.  Very inspirational!
I'll be back on my blog after the wedding Saturday, and hope to post before Tuesday.  But, if I don't get to it, I will be back with Technique Tuesday next week.

Enjoy your week!

Blessings,

lynda

Tuesday, November 24, 2009

Technique Tuesday - Embossing With Wet Watercolor


This is a technique I use often, as I love the soft, muted look of the watercolor with the embossed images. Unlike detailed watercoloring, this wet watercolor technique is fast, and very freeing. It calls for a very relaxed approach.  The thing is, this technique is very addictive.  Once you make one, you will want to paint all of your images this way.  It works especially well on large images, as you will see by the cards below. Here's how it is done:   (CLICK ON IMAGES TO VIEW LARGER)                                                           
  • Emboss the image on watercolor paper, or good quality cardstock.  I usually use white, so the colors will be true.
  • Use a waterbrush (a tool that has a barrel that holds water, with a brush on the end), or a watercolor brush. Dip the brush in water, and "paint" the image with clear water first. Your brush should be wet, but not dripping. Practice this for a while to get a feel for how much water to use.
  • Dab your damp brush into the first color of watercolor paint. Rub the brush around in the color until the brush has plenty of pigment on it. Bring this loaded brush to a palette and roll the brush around, depositing the color onto the palette.  Add water with the brush, a little at a time.  I usually add water, then bring some of the mixture to        another spot on the palette, and dilute this area even more. 
  • With the most diluted puddle that you just made, paint the first color onto your image. Because you have prepared your surface, the color should just feather out when you brush it on. The embossing acts as a block to keep the color inside the image.
  • Using a stronger part of the mixture you made, add more color to parts of the areas you just painted. When you add this stronger, or darker, hue, it will fade softly into the lighter hue that you previously painted, creating an automatic shading.
  • Repeat with the other colors you will use in your image.

That's it!  It really is that easy, but it may take a few practice runs.  I especially like this technique with white embossing, as in the poinsettia card. The embossing just pops out of the watercolor when you are finished. If any color stays on the embossing, just dab with a paper towel.
Tips:  *If you put too much color and want to lighten it, just dab with a paper towel.  *Don't overwork with the brush, as eventually the paper will "pill" and/or warp.  *After the image is dry, place under something heavy to straighten it if it is warped.  *If you are cutting out the image to mount onto another background (as in the butterfly card), be sure to cut just outside the embossing, so the embossed edge does not chip. *Practice, practice, practice - you will get it. *No need to invest in expensive, professional watercolors - a mid-quality palette of 12 to 24 colors will be fine. *You will get best results with watercolor paper. Some of the watercolor papers have a semi-smooth nap, so your images will emboss nicely. *Keep relaxed, and don't overthink or overwork your painting. Let the colors flow and blend into each other.
-     -     -     -     -     -     -     -     -
May you enjoy the blessings of family and friends this Thanksgiving, and may you be mindful of the many riches we enjoy each day.

Joyfully,
lynda

Wednesday, November 18, 2009

Trading Card Swap Cards Received

I had a really happy mail day today!!  In with the usual mail (bills, junk, propaganda) there were not one, but two envelopes that I couldn't wait to tear in to.  One was my card kit package from my winning last week (see last week's post - THANK YOU Deborah), and the other was from PICATSO, (J. Bartels).  Picatso is a resident cat at Magenta Rubber Stamps.  She hosted a Colors of Fall trading card swap, and I participated.  We had to make ten cards, and got nine back.  The cards I received are below.  As you can see, they are each individual works of art. There was also a little chipboard snowflake with sticky material so I could add glitter and use it as an ornament. Picatso always adds some little goodies in with the cards....thanks Picatso, and Magenta!

I love Magenta stamps.  They're different, and very individual. If you'd like to join or check out the Magenta forum, it's here:  http://groups.yahoo.com/group/roxanelecat/ .

These are the ATC's I received today:


 Happy stamping and scrapping!

Blessings,
lynda

Tuesday, November 17, 2009

Technique Tuesday - CD Case Shaker Card


CD Case Shaker Card

I first learned how to make these from The Stamping Studio website (www.stampingstudio.com). That was about three years ago, and I have made several since then. They are very easy to make, and are fun to give, and even more fun to receive.  Unfortunately, they do not scan well, as they are not flat, so the scanner blurred them a bit, but you will get the idea.

They start with an empty plastic cd case.  I was fortunate enough to find a couple of dozen of empty cd cases at a garage sale, so scooped them up. I have seen them at lots of different stores, usually in packages of six or so. Be sure to get the older kind, not the really slim ones, as you need room for the filling to shake around.

BASIC ASSEMBLY INSTRUCTIONS:
  • Snap cd case apart at hinges and put top aside.
  • Cut decorative paper for background to cover bottom (inside the case) - 5 1/4” x 4 3/4” on most cd cases (measure your case to be sure you cut the right size).
  • Glue background to case using glue stick.
  • Add any further papers, stamping or embellishing as you desire.
  • Snap top back on and feed “filling” (beads, stones, charms, punched shapes, etc) through the gap (there is an open space) on the left side of the case.
  • Fill gap with fun foam, using a tape runner to adhere.
  • Wrap case with 7 3/4” x 4 3/4” cardstock or decorative paper, creasing at the sides with your fingers.  Secure with glue stick on the back, and tape runner on the front.  Be sure the left side is long enough to cover the opening and foam.
  • Embellish outside as desired.
Specific directions for card at right:  (stamps by Hero Arts)   
Prepare case as above. 
Glue in red word background with glue stick, trimming slightly to fit if necessary.
Tear dotted cardstock (cs) and distress with sponge and green ink.  Stamp Friend or other word on bottom right side as in sample.  Adhere to red word piece in case on left side.
Stamp F4323 Doodle Leaf Flower with markers in colors desired.  Sponge with green ink, then cut out and adhere over red and dotted piece in cd case, as shown on sample.
Thread button with embroidery floss and tie knot.  Adhere to flower with glue dot.
Stamp You Are Special (from LL206 set) with green marker onto white scrap, sponge with light green, and trim close to words.  Adhere to striped scrap, slightly off to the top and right, as shown in sample.  Adhere to inside of case with foam mounting tape.
Attach top to case, then pour in fillings through gap.  Run Diamond Glaze or any clear drying glue along bottom and sides to secure shut.
Fill opening with fun foam, securing with tape runner.
Glue pink cardstock piece around to wrap and cover seams along sides.  Use tape runner on top of case to secure strongly.
Cover pink “wrapper” with red and striped strips provided.
Stamp F4323 Doodle Leaf Flower again with markers, sponge with green, then cut out petals and use along left side seam.
                                                                                                                                                                                    
That's it. They're easy, and they're fun to make. Think about all the occasions these would be good for. There's so much you could do for Christmas....use sequins and snow filling, punch out stars, use all your Christmas paper scraps!
-------------------
Wedding plans are shaping up.  Still so much to do, and so little time.  Less than three weeks to go!  It's hard when Faith is in Buffalo, and I'm here.  Lots of traveling these past few weeks.  I'm off to the bachelorette party Saturday, then there's Thanksgiving, then back to Buffalo the weekend after Thanksgiving to decorate and finish up loose ends.  Whew.  I'll be looking forward to just enjoying the day when it gets here!  Here's the link to Faith and Dan's wedding website if you would like to take a peek:  http://www.ewedding.com/sites/faithie1122/
--
Now it's off to work on the card box for the wedding.  I hope you are enjoying these late fall days, and preparing for a wonderful Thanksgiving celebration. May you be surrounded by family and friends, and enjoy your loved ones.

Blessings,
lynda

Tuesday, November 10, 2009

Pop Up-Pull Up Card               
Here's a blast from the past!  I made these cards a couple of years ago, and just found the pictures in my photo gallery.  I gave the giraffe card to Keeley, and she loved pulling on the tab and seeing the giraffe pop up!                                                             I loved the technique so much that I made and sent several cards from the "pattern" that was on the Hero Arts website then.  Jennifer McGuire had a tutorial on the website on how to make these cards, and I tried it. They are much easier to make than they look, and come together in just a few minutes.
I have added Jennifer's link from Hero Arts here, which has full instructions with pictures:
                                                                  
Pull Up, Pop Up Card - by Jennifer McGuire, Hero Arts

 I hope you will try these.  They're so fun, and really easy. You can make them cute and playful, like the one I made for Keeley, or elegant like the pretty flower one I made here.

                                                                               
These pictures show the cards in their open position.  The pictures on the link show both open and closed, and the directions are concise and easy to follow.
Have fun with this, and if you try it, send me a link to your card.  I'd love to see what you do.

On a personal note, the Buffalo shower for Faith was wonderful. There were about 40 of us there, and I must say, her bridesmaids handled everything very well. There was lots of food, fun, and laughs!
This weekend we're getting Keeley from Friday to Sunday, then the following weekend it's a wild and crazy night out for the bachelorette party!
I can hardly believe the wedding is in just 24 days!!  Lots to do yet....card box to make, garter to make, and a special book I'm making for Faith.  Whew.

Enjoy your week, and have fun with this Technique Tuesday project!

Blessings,

lynda

Monday, November 9, 2009

I won some blog candy!!


Autumn - Thanksgiving
Originally uploaded by ScrapyCrafter

It was a glorious 70 degree day here, and I got out of work early and got to enjoy this little gift of sunshine and warm breeze. I took Nelson (my neighbor's Boston terrior who we are dog sitting for two weeks) for a nice long walk, hung out some sheets on the line to dry, and just enjoyed a couple of hours of solitude.


When I came in to check my emails, there was another surprise waiting for me. I won some blog morsels!!! I nominated this card by  Yaneri Rodrigues (ScrappyCrafter)  as my inspiration for this blog challenge, and we both won an awesome package of goodies from Deborah of Deborah of Society of Stamp and Scrap-aholics
Deborah has so many fun things going on on her blog each week. Stop by and check it out, you'll be glad you did.  Here's what Yaneri and I won:  A card kit including (picture of kit on Deborah's blog (link above):
  • 1 Hero Arts card base and envelope (not shown)
  • 8 pieces of My Mind's Eye 5.75" x 5.75" patterned paper (2 of each pattern)
  • 2 Nestibility paper shapes
  • 5 stamped Inkadinkado images (not shown - it's a surprise!)
  • 2 yards of ribbon (Martha Stewart)
  • 3 decorative brads (Makign Memories)
  • 3 buttons (Autumn Leaves)
  • 6 sequin flowers 
  • 3 glitter flowers with 3 mini brads (Heidi Grace)
  • 1 large flower (Prima)
  • 1 large gem (Creative Imaginations)
  • 1 scoop Martha Stewart fine glitter in Carnelian
  • 1 surprise element!

Thanks, Deborah.

Be sure to stop by Yaneri's blog (link above).

Tomorrow's Technique Tuesday on my blog. Be sure to stop back, and leave some love!!

Blessings,

lynda

Saturday, November 7, 2009

I thought I'd share this layout I did for a sketch challenge on Treasured Scrapbooking.  They provide a monthly sketch, then issue a challenge for members to submit entries for.  I love participating in their challenges and calls. One of my cards was recently the layout of the day.  It really is a terrific community, and everyone there is very encouraging.  Check it out if you like to participate in challenges, swaps, etc: www.treasuredscrapbooking.com . My name there is Joyfulstamper.

Here's my entry for the November sketch (click if you'd like to see it larger):


I'm playing catch up on some old photos.  This is when our granddaughter, Keeley, was just four months old.  As she's now four YEARS old, I've got a lot of scrapping to do.  I have done some, but have lots of pics around waiting to be scrapped.

Tomorrow's the Buffalo bridal shower for Faith.  I get to relax at this one...lol!  Should be fun, and the weather is supposed to be lovely. Yay.

Hope you enjoyed the gorgeous day today, and get to enjoy tomorrow!

Blessings,

lynda

Wednesday, November 4, 2009

Swap Card - Thanksgiving

I just have to share this cute, cute, cute card I received from a swap I was in through the Hero Arts Flicker Group.  The card is from Kelly Booth, in California.  The turkey was colored with Copic markers.  Don't you just love him?  The google eyes are so adorable.  I know I just have to get me some of those Copic markers.  I have been avoiding them, and trying not to think about them, but I'm not doing so well with that.  Especially when I see something like this little turkey guy!!  Gotta get 'em!


                                Swap card from Kelly Booth
If you like to get ideas, inspiration, and sometimes chat online, and enjoy challenges and swaps, think about joining this Hero Arts Group on Flicker.  Just sign up for an account on Flicker (it's free), and then sign up for the Hero Arts Group.  That's it!  You can post your cards and layouts on Flicker if you like, and you can view literally thousands of galleries.  It's fun, fun, fun.  I really enjoy it there.  If you'd like to see my gallery on Flicker, my name there is Joyfulstamper.  And be sure to check the Hero Arts Blog whenever you can, it's chock full of inspiration and great ideas!!

Looooong day at work today.  I disassembled and re-arranged two full book displays, adding some new selections and weeding out the old.  Lots of Christmas books coming into Weggies!!  My book department looks so good now!!  I'm very tired, and hitting the hay early tonight.  But not till after Glee!!  lol.

That's it for now.  If you haven't checked this week's Technique Tuesday, scroll down and check it out. It's all about the details!!

Joy,

lynda

Tuesday, November 3, 2009

Technique Tuesday - It's In The Details

It's in the details....
I know....brown and green AGAIN!  Sometimes I just get hooked on a color combination, and just run with it.  I do love the way these two colors work together.  I blame it on the flowers I found, green with touches of brown. I saw them and thought they were interesting, then immediately challenged myself to make some cards/pages using them....hence the onslaught of this color themed projects.

Now, on to the card. This is the finished card.....


 Here are the details broken down (click on images to see them larger).....

Distressing - I guess if I have a "signature" technique that I use on almost all of my cards and pages, it would be distressing. It really takes any card or page from ordinary to extraordinary in one simple step.  Notice the green around the image area, and the brown around the outside of the card. This is one form of distressing, and the simplest to achieve.  I use pieces of cut up Cut n' Dry foam pad (you can use pieces of sponge as well).  Simply dab the pad or sponge onto the stamp pad, picking up plenty of color. Then run the pad or sponge along the outside of the area you want distressed. You can control the amount of "distressing" that occurs by how you hold the pad or sponge.  Tilting it inward gives more color, while holding it perpendicular and running it just along the edge gives a more crisp edge with just a hint of color.
Background stamping - Notice the background on the tan part of this card. It is not decorative paper...I stamped it using two different stamps. The secret to keeping the background unobtrusive is to "stamp off" before stamping on your card. Here's how:  I inked the triangle background stamp with green ink, then I stamped it onto scrap paper lightly, then did it again, very lightly the second time. There was just enough ink on the stamp for my background. I huffed on the stamp and stamped my background. Huffing, or breathing directly onto the stamp, reactivates the ink, which is important when there is so little left on the stamp. Next, I did the same thing with the word background stamp.  I had to repeat these steps, as neither stamp was large enough to cover the entire card.
Layering - Layering is probably the single most important thing you can do to raise the interest of your card. Layering helps separate and highlight the main elements or images. Also, layering introduces color and helps balance your composition. I layered brown under the main image to help the eye focus in on the object (flower). The green panel behind, and just up and to the left, is to bring some green into that part of the composition, and to balance the elements that I knew I would be adding to the bottom right.


Corner Interest - When I have my pieces ready to assemble, I "play" with them, and begin to create my composition, laying out the pieces, moving them around, trying different things with them. During this process, sometimes I feel there is something not quite right. In this card, for instance, something was bothering me. The image is soft and elegant, so I wanted to emphasize this in the finished card. That's when I realized it was all the right angles. I simply punched the corners of the main piece and border, and voila!, instant elegance! Of course, I re-distressed the edges after I punched the corners.
Borders - Borders add a nice surprise element to any project, and are easy to achieve.  A border can be stamped on, drawn by hand, or it can be a strip or more of patterned paper. In this case, I chose to use an embossing template. I ran the main card through my Cuttlebug with the border template at the bottom (you can do this with a template and a light box if you do not own a die cut/embossing machine. Again, keeping with my theme of details, notice the green on the raised branches. I simply ran my green inked Cut n' Dry pad along the border, lightly, so that the color stayed on just the raised areas of the embossing.

Embellishments - I must say, I am a true embellishment addict!! This is probably another of my "signature" techniques. I use flowers, ribbons, charms, brads, eyelets, tags, anything that will add a touch of interest to and enhance my project. Sometimes the embellishment is an afterthought, something I add after the main parts of the card are assembled. In this case, as you read above, the main element, the flowers, inspired the card, and I created the card because I was inspired by the element. 
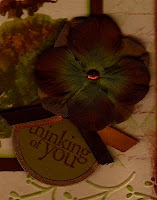
While I'm on the embellishment area of this card, I'd like to point out that I didn't simply plop a single flower down in the corner. I layered two flowers together, and secured them with a coordinating brad. This is where I ran into a problem, as I had no brown brads, and my green ones were the wrong shade. I "colored" my plain gold brad by sanding it slightly to help it hold ink, then I put the brad into a tweezer and dabbed it into a VersaMark clear ink pad, then dipped it into copper embossing powder, and heated it. While it was still hot, I re-dipped it into the powder to give it a second layer of embossing. Voila! - a copper brad.
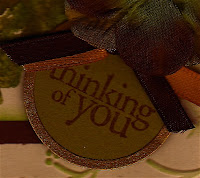
Notice, also, the tag and ribbon directly under the flower. The tag gave me a vehicle for my phrase, and helped create an embellishment "grouping," rather than just a single embellishment. If you notice tabletops and shelving in decorator magazines, there are groupings of interesting elements, rather than just a single item. I follow this same idea in my card and page compositions.

I used my Cuttlebug to create the round "metal rimmed" tag. All of my metal rimmed tags were white, with silver rims, so I simply made my own. The rim was a scrap piece of ancient gold shimmer paper, which was just what I needed. I ran the tag die through my machine twice; once on green paper for the center, then on gold shimmer paper for the rim.  My sentiment fit perfectly on the tag, and was easy to place with Hero's clear stamps!  Finally, I tied two pieces of coordinating ribbon into a knot and adhered them to the tag top with glue dots.

Finally, a word about Color - Never underestimate the power of color.  I am often told that I have a natural "color sense." Well, maybe so, but I believe anyone can learn how to mix, match, and coordinate color. It is an art which can be developed. Browse through current magazines, look at fashions in clothing, furniture, accessories. Look at the outfits in your closet. Challenge yourself to try new color combinations you see there, which you may never have thought to combine. The guidelines are simple....ask yourself, "does this appeal to me?"  If so then go with it.
For me, this week it's brown and green, next week, who knows.  I did just see a lovely orchid, cream, and green afghan I just love.  Hmmmm....I think I see a layout coming!


Thanks for visiting! Leave some love if you're so inclined.  Come back soon!

Blessings,

lynda


Tuesday, October 27, 2009

Technique Tuesday - PAPER PLEATING

HOW TO PLEAT PAPER

I have had a request for a how-to on paper pleating, so decided to write my Technique Tuesday on the paper pleating technique.  It's a really easy technique to do, and the results are very striking.  Often a little pleating on a card or page is just the thing it needs.  Here's how it's done: 

PINCH PLEATS 


  • Begin with a strip of paper approximately 1 1/2" wide. Score first at the 1" mark, then at the 1 1/2" mark, then at 2 1/2", then at 3", alternating between adding 1/2" and 1" until you get to the end of your strip.                                                 
  • Apply tape runner along the top edge of your scored strip (either edge if no pattern).
  • Using the scored lines, accordion fold the pre-scored strip.  Beginning at the left side, make a mountain fold (paper folds up like a mountain), then a valley fold (paper folds down, like a valley).  Repeat mountain and valley folds, tucking each 1/2" section behind the 1" sections to form the pleats.
  • To create a longer strip, repeat the process on a second strip.  Adhere to first strip by taping two half-inch sections together. This is so the seam will be tucked behind a pleat, where it will not show from the front of your card or page.
  • If you like a distressed look, lightly sand or sponge ink to your pleats, or distress the top and bottom edges.
  • Adhere to card or page with tape runner.  For a more finished look, attach ribbon or trim along the top edge of the pleated strip to hide the edge.

BOX PLEATS


  • Begin with a strip of paper your desired width, say 1/2" or 1", depending on where you will use it. Score at 1", then 3/8", then 1", then 3/8" intervals along entire strip on back of paper.
  • Starting at one end, begin pulling and pinching and pleating on the scored lines.  You will be folding the 3/8" scores toward each other, alternating from front and back sides, until all folds are completed.
  • Run tape runner across the back of the strip to hold the pleats in place.
  • Adhere to card or page with tape runner.  For a more finished look, attach ribbon or trim along the top edge of the strip to hide the edge.
  • On this card, I lined the "valleys" with tan cardstock to offset the pleats and break up all the green. I just cut 1/2" strips of tan and taped them in the valleys.
That's it!!  I told you it was easy!  Now, you try it.  And be sure to let me see what you created!

Enjoy and savor this glorious fall day!!

lynda

Friday, October 23, 2009

Bridal Shower Favors

It's SIX WEEKS till the wedding!!

There, I got that out!  Whew!  These weeks are flying by, there's so much to do.  Faith (my daughter) is holding up well, and surprising me with some very sensible decisions and choices.  I'm actually doing very well, also.  
We've been busy, busy, busy, getting things ready, having fittings, last minute changes and orders, and so much more.  
Right now my focus is on this weekend, Sunday, to be exact.  That's Faith's bridal shower here in Rochester.  My friend, Sylvia, and I, are giving it.  It is being held at Sylvia's house, and I must say everything is simply lovely.  We decorated Tuesday, copying Martha Stewart's ideas.  We have shimmering tulle in the chandelier, with crystals hanging from it.  There is tulle "poufed" around the table, with ribbons and beads.  It looks magical.  All I can say is, move over Martha!  lol.

Seriously, though, I think Faith will be pleasantly surprised when she sees it.  Sylvia is very, very talented with food  and hospitality.  She's a hostess to the max, and really knows how to plan a party.  I am the designated design artist for invitations, favors, decorations.  We make a great team, and it has been fun planning this event.  Hmmmm.....maybe we should go into business with this!


Anyways, back to the blog.  I have posted a couple of pictures here of the favors.  I made the little candy "purses" as an afterthought, after I already made these post-it holders.  Had to have 'em, as they're just too cute, and Faith loves purses and shoes!  They (the purses) have little Hershey's nugget chocolates in them.  


The Post It holder is actually one of those acrylic frames.  I got them at the Christmas Tree Shop for 89 cents each.  Instead of standing it up, I laid it flat.  I slipped a piece of vellum paper with rosebuds on it inside the frame, to fit, taped these pretty post-its (Joann Fabrics had them) onto the top, then tied a ribbon around the top.  I embossed the butterfly (Penny Black stamp) and colored it from the back with markers.  That's it....easy, and very elegant.  These can be done for any occasion with different types of papers.


So, now I'm working on the thank you notes.  Hope to have them done by Sunday, so Faith can take them home with her.  After that project, I will be making the card box for the wedding.  I made one for one of Faith's friends, and she wants me to make hers. Here's the one I made for her friend's wedding.  The colors on Faith's will be different, and a different design, more elegant, less whimsical.  Can't wait to go shopping for the supplies and pick the colors.  She wants ivory with gold, with some flowers and ribbon.


Well, it's off to dreamland for me.  Been a loooooong week.  I have cookies to cut out and bake tomorrow for the shower, a prayer shawl to deliver, vegetables to get into the freezer before they spoil (from our farmer's market), finishing touches for the shower, and a shower gift to shop for yet, all before Sunday!


Hope you have a wonderful weekend.  Enjoy our fall blessings!


Joyfully,


lynda


Wednesday, October 21, 2009

Technique Tuesday - White Resist Double Embossing


This Techique Tuesday I am sharing one of my very favorite techniques.  I used white embossing powder, clear embossing powder, and pigment ink pads to create this card.

The floral panel attached to this card was created with double embossing.  Here is the technique:

  • Emboss flower stamp (Hero Arts) with white pigment ink and white embossing powder.
  • Using desired shades (in this case blues and greens) of pigment inks, rub inks directly onto the card panel, over the embossed image. Use three or four colors, starting with the lightest color and working up to the darkest color.
  • Use a tissue to gently blend the colors of inks, and to remove the pigment ink from the embossed image.  Do not rub tissue too long, as you want the ink to remain slightly wet.
  • Pour clear embossing powder over the entire stamped panel, then heat and emboss.  The white image will "pop" out, and the inked background will be embossed with a glazed finish.
To finish constructing the card:
-Tear scrapbook paper and attached it to a blue A2 card.
-Stamp swirl stamp (Hero Arts) on the bottom left with white ink.
-Attach the embossed panel to a white torn panel, about 1/2" larger all around, then distressed it with blue and green inks. 
-Stamp BELIEVE onto blue scrap and distress.  Attach straight pin threaded with beads.  Attach to panel.

That's it!  I do love this technique.  Try it with some fall colors for your fall and thanksgiving cards! Let me know how you do - I'd love to see your work!

Blessings,

lynda

Sunday, October 18, 2009

ATC Swap Card for Magenta Swap


I got my trading cards in the mail yesterday for Picatso's (Magenta Rubber Stamps) Artist Trading Card swap - The Colors of Fall.  This is my ATC for the swap.

The guidelines stipulated using Magenta stamps, and I just love this one.  40138-J is the stamp number.

I stamped it on the green cardstock, then on the brick, brown, and plum.  I mounted the brown leaf and the plum acorn (cut out) onto the orange card. Then I cut openings in the green card front, cutting out the leaf and acorn along the outline, so you can see down into the ones I mounted onto the orange card.  I attached the green card over the orange card using foam mounting tape for dimension, and to give the openings "windows."  I attached the brick leaf with foam tape over the green card.

All images were colored with Berol Prismacolor pencils, with white added.  I distressed the edges, and added highlights with the clear Stardust gel pen.  Three rhinestones were added to finish off the ATC.

I can't wait to see what I get back.  I made 10, and will receive 9 back.  I will post them when I receive all of them.  Here's a link to the Magenta Group on Yahoo, if you're interested in joining the group. It has lots of interesting challenges, swaps, and techniques.  http://groups.yahoo.com/group/MagentaCN/

Now I'm off to bed.  It's been a busy day - Farmer's Market this morning, cleaning the house, laundry, working on Prayer Shawl flyers for the ministry fair at church tomorrow, and making a big pot of chicken noodle soup!!

See you soon.

Blessings,

lynda