Saturday, April 21, 2012

Watercolor Butterflies Spring Card

Making my own Spring!

Challenges!  I love them.  Every once in a while, one really seems as though it was made just for you.  That's the case for me with this Tuesday Trigger Challenge on the Moxie Fab blog

I'm drawn to bright, cheery colors, and this challenge just drew me in.  All that delicious color, literally dripping from the page.....I LOVE IT.  This is the trigger picture. Aren't those butterflies and colors just gorgeous?  I want that dress!!

As I poked around in some of my other favorite blogs, I noticed the  Penny Black Saturday Challenge was to use no patterned paper.  Easy-peasy, as I already knew I was going to make my own background paper using my Penny Black butterflies in those gorgeous pinks, oranges, and purples!  I inked up three different butterflies with the colors from the dress, then spritzed them with lots of water and stamped onto card stock that I had also spritzed with water.  Then I 'flicked' on some splotches with a wet paint brush dipped into ink.  I inked up the Penny Black tulips with the same colors and used those for my focal point.


Then I checked out Card Patterns challenge on their blog and really liked the sketch.  I decided to turn it vertically and pretty much followed the way they had it laid out.  I used one of my favorite Martha Stewart punches for the borders on each side of the hand made butterfly panel.  I added some 'scrunching' to the ribbon, and used my Bow-Easy to make the bow. 


Finally, I headed over to the Play Date Cafe blog  and found this unbelievably scrumptious color challenge.....using the same colors!! 


So, I headed to my craft room and couldn't wait to get started.  I pulled out my inks, spritzer, stamps, papers, and ribbon and got to work.  Here's my card:
It was a dreary, rainy day all day long.  After going for coffee with hubby, and making some goodies for a party tomorrow, I got to play in my room, and made my own spring!  Aren't we stampers lucky!  Enjoy.

Blessings,

lynda

Thursday, April 19, 2012

My Favorite Flourishes Stamp Set


Hello friends!  It's a lovely springy-type day here, and I got out for a bit at lunch time to enjoy the sunshine.  Home from work now, and just finished dinner.  I wanted to get this card up on the blog, so here I am at the computer.
I made this for a dear friend who is going through a troubling time right now, so I chose a soothing blue card stock, with my favorite springtime stamp set from Flourishes.  It just so happens that this week's Timeless Tuesday challenge from Flourishes HERE is to use your favorite Flourishes stamp set.  So, here is the favorite set.  Isn't it so lovely with the beautiful calla lilies and comforting phrases and pretty mixed scripts? 

I wanted the card to be a little different, to vary from the usual focus on the flower filling most of the card.  I tried to think of a different way to use this stamp.  I thought of using it in pieces, and while I was scrolling the web for another challenge to incorporate with my idea, I came across this great sketch from the Mojo Monday blog challenge HERE
Here's the sketch.  It's fun, yet I chose to make it a little more formal.  It could be used in so many ways.  I chose to dress it up a bit, with some lace, and rhinestones....and, of course, a bit of glitter.  Some embossing on the blue on blue panel with a bit of distress ink sponged on gives it a more formal background.

I'm already thinking of so many other stamps that would lend themselves well to this technique and sketch!  Can't wait to get in my room to play.....maybe tomorrow!

Here are some close ups of the card's details:

That's it for tonight.  Now I'm going to make a cup of tea, and do a little reading, perhaps some knitting, and call it an early evening.

I hope my friend likes her card.  She's a non-stamper (yes, there are some people who don't stamp), so she won't be seeing it on the blog.  Can't wait to get it out.

Enjoy your evening, and the rest of the week.

Blessings,

lynda


Sunday, April 1, 2012

Rubber stamps, inks, die cuts and ....feathers!


I made these cards on Saturday.  I looked forward to the day all week long, knowing I was finally going to have a day to myself (well, after having breakfast with hubby, and doing some errands in the morning).  I brewed a pot of coffee and headed up to my craft room, ready to create in ignorant bliss.  Sounds great, right?  Well, not so much.


I had nothing....nothing!!!  I looked through my stamps, put some stamp sets on my desk, pulled some of my favorite papers out,  and checked out the current challenges on my favorite blogs.  STILL nothing was coming....no mojo/  So, I decided to catch up on some phone calls.  And while I chatted, I moved my 'stuff' around on my desk, straightened, fingered through my ribbons and gems, and started matching up fibers, gems and ribbons with papers.  Then I saw it......the feather drawer!  Ahhh, I LOVE feathers.  So I pulled some of those out as well,  And, as luck would have it, I found a challenge that called for using..wait for it......yep, feathers on your project.  That was it....I was in business.  My mojo was coming back (of course, by then it was dinner time).  Then, finally, I got to stamping, cutting, mixing and matching, and having FUN!  Alas, I was feeling great, and enjoying what was left of my day and night of creating! 
     Here are some challenges these cards are in:

Card Patterns (sketch above) here http://www.cardpatterns.blogspot.com/ .

Moxie Fab Fascination with Feathers challenge here http://www.moxiefabworld.com/2012/03/fascination-with-feathers-challenge.html  
and their Tuesday Trigger challenge here http://www.moxiefabworld.com/2012/03/tuesday-trigger-happy-happy-joy-joy.html
using this inspiration picture: 
 Here are some up-close details......


Hat pin with clear beads with the feathers


I colored the aqua feather with Copics
White and brown feathers with Hat pin and beads
Background stamped with white pigment ink


Feathers, stamps, pins, beads....and spring!  What can be more fun!
Blessings,
lynda


Friday, March 30, 2012

Floral Thank You Card


I finished this card last night, but just couldn't stay awake to take the picture and get it up on the blog.  The stamp is from Hero Arts, one of their oldies but goodies, which I colored with markers and misted and stamped.  I sponged the die cut and layered it on the Spellbinders label die.

I did this card for the Hero Arts contest this month for the flowers theme.  Check out their blog http://heroarts.com/blogs/club/ .

I also entered it in the Card Patterns challenge here http://cardpatterns.blogspot.com/ .
Here's the sketch they have this week.

Also, I entered it here http://www.lilypad.inlinkz.com/2012/03/23/simon-says-stamp-presents-a-flower-challenge/ at LilyPad's flower challenge.

Well, that's it for now....I had a long, long, LOOOOOONG day, and am exhausted.  Think I'll take the night off...do some knitting, have a glass of wine, and just relax.  Ohhh, that sure sounds good!

Blessings,

lynda

Monday, March 12, 2012

Colorful Spring Daffodil Card

Inspiration 
We had a wonderful weekend with our granddaughter, Keeley, at our house for three days.  There's nothing like the innocence, fun, and spontaneity of a seven year old girl to keep you happy!

The first thing Saturday morning, Keeley asked if we could stamp.  Of course, I said YES!  She went right to her stamping supply box, and I gathered some stamps.  She made me a birthday card, drew me some pictures for my refrigerator, then proceeded to stamp and color some birthday cake stamps to make birthday party invitations for her mom, dad, and sister for the birthday celebration we would have on Sunday when they came to get her.

Penny Black Daffodils stamp colored by Keeley
I decided to show her how to color on the solid-type stamps with markers, spritz, then stamp.  Well, that did it.....she was hooked on that technique for the rest of our stamping time together.  I used a daffodil stamp, and colored it in shades of yellow and green, spritzed it with water, stamped, and she let out a squeal and her eyes were as big as saucers!  She said it was like magic and couldn't wait to try it.  I handed her the markers, and she proceeded to make one just like mine.  Then, she asked if she could use any colors.  Well, of course I encouraged her to use whatever she wanted and to make it look however she liked.  Here is Keeley's interpretation of spring daffodils.

Don't these colors just make you smile and want to sing?  I kept looking at her design, beat down the 'adult' part of me that wanted the daffodils to be yellow, and truly enjoyed her imagination, playful colors, and inspiration.  Isn't it grand what we can learn from children if we just let go of our pre-conceived ideas and 'should be's?'

After card-making and lots of laughs, fun, and smiles and mess, we cleaned up and made cup cakes for the party.  Her mom and dad oooohed and aaahed over her creations on Sunday, and we all enjoyed the cupcakes.  Everyone knew where to sit with their place settings.  We had a great weekend, and although Keeley learned a new stamping technique, I think I learned much more from her.  I truly enjoyed her child-like abandon, and learned to let go and be more open to what I am feeling and not let the should-be's have so much say in my creative time.  Her daffodils are magical and fun....I would love a vase full on my table right now.

Card I made from Keeley's design
Today I made a card from her piece.....Here is the finished card, which I will send to her so that she can see what she taught Nana last weekend!

I have entered it in the following challenges:
http://pennyblackatallsorts.blogspot.com/  Springtime challenge,
http://allsortschallenge.blogspot.com/
Say it with flowers

That's it for today, stampers.  I hope you find some inspiration where you least expect it.  And I encourage you to open your eyes to the possibilities around you, and let your heart lead you in your crafting.....lose your inhibitions, think like a child, and let YOUR inner child out to play.  You'll be glad you did!

Blessings,
lynda


Sunday, March 4, 2012

Birthday Card With Markers and Dove Blender

Tombow Markers and Dove Blender 

Here's a blast from the past!!!  I love this giraffe stamp, and have had it for years.  I taught a class on coloring with markers a few years ago at The Stamp Pad, and used this stamp. 

The stamp is from The Artful Stamper.

I embossed it with black on white card stock.  I used Tombow markers.  Starting with a creamy light beige, I colored along the middle of the face (nose and forehead, along the outside of the ears, and along the right side of the neck. 

To create shading, I added a shade darker next to the creamy light beige, then blended the two with the Dove blending tool and Dove Blender Fluid.  The fluid in the Dove blender mingles the two colors so there is a soft, gradual fading from one color into the next. 
Close up of coloring and shading
Finally, I ended with a much deeper shade of topaz along the left side and the outsides of the face and insides of the ears, and the horns.  Using the Dove blender, I blended the dark shade into the medium.  I used a much lighter shade to create a shadow effect along the outside of the giraffe image. The torn edges and the fibers finish off the masculine look of this card.
This is a terrific card for a man.  I tend to make lots of girly, flowery cards, then never have masculine ones around when I need one.  Think I'll make up a couple of these to have on hand for those guys in my life.

Blessings,
lynda

Wednesday, February 22, 2012

Three Color Card with Word Stamps and Cuttlebug

     Have you ever been inspired by something and thought what a great card or scrapbook page the components or colors of what you saw would make?  I was shopping for some clothes for work, and was instantly inspired by an outfit I saw.  I would have purchased this pants and top on the spot, because the color combo really caught my eye and held my interest.  It was black, white, and lime green.  How striking and crisp it looked.  Alas, they had not one in my size.  So, I came home and made a card using this striking combination. 

I entered this card in the following challenges:
http://ourcreativecorner6.blogspot.com/ - Black and white with a splash of color
http://thesecretcraftersaturdaychallenge.blogspot.com/ - Bingo challenge using gems, swirls, ribbon
Here's the sketch for the MojoMonday challenge                                                          
This close-up shows the background details.  I started with a white card, added a black panel, then embossed four 1 1/4" strips with my Cuttlebug and embossing template and placed them evenly along the black card to create the panels called for in the sketch design.
This one shows the circle of gems that I love so much.
 I used Just Rite stamps from their Sending You Sunshine clear stamp set, and the thinking of you is from Flourishes.  A touch of lace from my stash, and some swirl rhinestones complete the look.

Hope you're having a great week!

Blessings,
lynda 


Saturday, February 11, 2012

Fancy Hearts Card

YUMMY VALENTINE INSPIRATION
     I took my inspiration for this card from the Moxie Fab Fancy Schmancy Tuesday Trigger blog challenge http://www.moxiefabworld.com/2012/01/tuesday-trigger-fancy-schmancy.html.  Here is the yummy picture that was the inspiration.  They just look as though they would melt in your mouth, don't they?!  
     I was excited to see the pink and brown, as I love those colors together, and I knew exactly what paper I would use.  This heart swirl paper from Basic Grey was just what I wanted.  I entered this in the Basic Grey Hearts/Love challenge here http://basicgreychallenges.blogspot.com/
     Allsorts challenge bloghas a Free and Easy Friday challenge, which I also entered with this card here http://allsortschallenge.blogspot.com/A scan of my heart stamps and I found the perfect ones from Impression-Obsession.  Here's my take on the challenge:
Close up of details:                                                                                                                                     

  
A few pearls, some ribbon, and feathers to tickle the fancy!  So much fun on a cold, blustery, snowy day!

Blessings,
lynda

Friday, February 10, 2012

Valentine's Day Card Using Cuttlebug & Spellbinders

Happy Valentine's Day.....I'm BACK!!

SCROLL DOWN TO SEE ENTIRE CARD
Hi there!  I know it's been a while since I posted, so I thought I'd catch you up.  I really, really missed blogging - and spending lots of time in my craft room.  I'm finally able to take a breather, and getting back to a semi-routine.  AND, finally stamping and scrapbooking again.  I'm so excited to be back in my room doing what I love, love, love to do.  I'll catch you up, then show you one of my Valentine creations I made for the Cart Patterns Sketch challenge.  Here's a link to the challenge blog:  Card Patterns Sketch 151 .   Here's a sneak preview.  Scroll down to see the rest of the card after my catch-up.


CATCH UP:  My "new" job (I started in June as administrative assistant/secretary at my church) is going very well, and I LOVE, Love, Love it.  Can't believe it's been  eight months already.  Seems like I just started.  I actually enjoy going to work every day, and look forward to it.  It's interesting, challenging yet not overwhelming (now that I know what I'm doing most of the time), and the staff is WONDERFUL - the best people I've ever worked with.  Did I say I LOVE MY JOB?!  Ok, I guess I did.

My family is doing very well.  Faith, Dan, Keeley, and Kennedy, the joys of my life are doing well.  Keeley was seven in January, and Kennedy was one in November.  It was a busy holiday season.  We celebrated Kennedy's birthday and Thanksgiving in November, Faith's birthday, Dan and Faith's anniversary, Christmas in December, Dan and Keeley's birthday and New Years in January.....with other extended family and friends occasions interspersed throughout as well. Phew.

Hubby's job is very unstable.  He's working three days a week now, in lieu of closing down entirely.  Praying for the company to get some orders so he can stay employed.  It's tough out there!

That's the 'in a nutshell' version.  I will be back here at the blog more often now that I have a better handle on my job.  I'm actually starting to take Fridays off, which I was supposed to have all along, but have been working just until I can do my work in the four days I was hired for.  I think it's time.  I took off last week, and this week.  Fingers crossed.  I figure if I can get through the holiday season in the church office, I can get through anything!

As far as this blog, I will be here as time allows, and when inspired, of course.  Today I would like to share one of the Valentine's cards I made.  I used a Cuttlebug embossing folders, an EK Success punch for the swirl cut-out area, and Nestabilities for the circle, Gina K. Designs stamp.  And here's the card......

And...just have to share a couple of pics of my favorite people:


That's it for now.  See you soon at the blog!

Happy Valentine's Day!

lynda

Thursday, November 24, 2011

Thanksgiving 2011

Ah, what a beautiful day.  The loves of my life were all together at my home, and we enjoyed a great meal together.  I was up at 5 AM to start cooking and prepping for the big meal, but I didn't mind, knowing how much my family would enjoy the fruits of my efforts.  Christmas music was playing all day, lending to the festive spirit of the day.

Turns out my daughter was sick, but my granddaughters and son-in-law were excited about coming, and looking forward to having turkey dinner, so they came anyways.  Faith mostly laid on the couch, bucket at the ready.  Dan and the girls enjoyed dinner with us.  Faith did get up a little later and tried some mashed potatoes, and was actually able to keep them down, so that was good.

We enjoyed a nice visit, and I took Keeley to see the new Muppet movie, which opened today.  We loved it, and it was so nice getting out with her for a couple of hours.  We laughed, and cried....well, I cried!  Yes, I cried at a Muppet movie, I know!  But it was so good, and I love, love, love the Muppets.  Hope you get to see it....and do let me know if it doesn't leave YOU with a lump in your throat! 

I'm so thankful today for my family, my health, our jobs, plentiful food and shelter, and this beautiful country we live in.  And I'm grateful for God's abundant love and grace.  May He richly bless you this Thanksgiving, and throughout the Christmas holiday.

In Him,

lynda

Tuesday, October 4, 2011

Technique Tuesday - Glitter and Marker Fall Flower Card

I pulled out one of my favorite Penny Black stamps for this card.....I just love this fall flower.  I chose to emboss it with black, and colored it with Tombow markers.  After assembling the card, I felt it needed a little something, so I added some glitter.  This just kicked it up a notch, don't you think?  

I finished off the card with a Spellbinder's die label.

Just a quick post tonight....to bed early for me.  

Blessings,

lynda 

Wednesday, September 28, 2011

Canvasette: Cornucopia card on canvasette with markers

Couldn't resist one more.....I am loving this canvasette paper!!!  Here's card two:
Can you tell I'm in FALL MODE?  I love everything about fall....the cool, crisp air, colorful leaves, fall foods, fall clothes, the smells and sounds.....everything!  I'm even more into spending time in my craft room.....stamping fall scenes, of course!  Gotta love all those rich, earthy colors and textures!

Hope you get to try this canvasette paper soon.  See my previous blog for the first card and details.

Blessings,

lynda

Tuesday, September 27, 2011

Technique Tuesday - Fall Still Life Canvasette

I was poking around in Michael's Craft store a while ago, and came across this pad of card stock weight paper with the texture of canvas.  It's called Canvasette, and looks and feels much like canvas that oil painters use.  I thought I would give it a try.  Here's my card:
I was really pleased with the look, and thought it looked rather like an oil painting.  If you click on the picture of the card, it will enlarge it, and you can see the canvas-like texture a little better.  In person, it really makes you wonder if it is, indeed, an oil or acrylic painting!
I started by stamping my image with permanent ink - I used Ranger's Sepia archival ink.  I chose the sepia, so that the outlines would be less noticeable than if I stamped with the standard black outline.  I felt this sepia gave the image a more oil-painted look.   
I then just started 'coloring' with Tombow water-based markers, blending and shading as I colored.  That's it!!!  It's that easy.  The paper does all the work.  I added some sponging to give it an aged look and soften it a little.

The stamp is one of my old favorites from Art Impressions.

Next time you're in Michael's, stop in the art department and pick up a pad of this canvasette and try it out.  You'll be amazed at how easy it is to create this look.

Blessings,

lynda

Tuesday, September 20, 2011

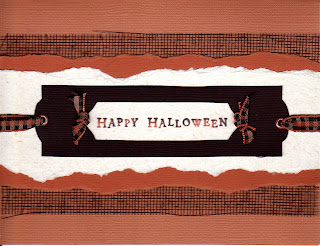
Technique Tuesday - Halloween Cards With Mesh

I was rifling through my stash, and found some pieces of mesh fiber "paper" that I just had to play with.  This isn't really paper, per say, but fibers that are woven together to create a piece of woven material that makes terrific backgrounds or accents for cards and/or scrapbook pages.

I was thinking halloween (already, right?  I know), and here's what I came up with:


I decided to keep the cards similar by using the same papers and colors.  The first card uses some black mesh material.  I used orange ink on the happy halloween, and tapped some black ink here and there.  A simple tag die cut, with some eyelets (remember those?) and checked ribbon complete the look.

On the second card, I chose white mesh.  The tag was hand cut, and the bats were from a punch.  I added some pen stitch lines on the white panel across the front of the card.

So, that's it for today.  Keeping it simple with two easy, clean halloween cards.

Blessings,

lynda

Monday, September 12, 2011

Technique Tuesday - Soldier/Flag Card With Distress Inks

I was inspired for this card this past weekend when hubby and I spent an evening down at the beach to see the flags commemorating the brave fire fighters who lost their lives on 9/11.  I remembered the gorgeous stamps I purchased at the recent stamp convention in Rochester.  These stamps are available from Our Daily Bread HERE


 I used ODB stamps with Tim Holtz distress inks - weathered wood, aged mahogany, and brushed corduroy.  I inked the stamps with the inks, then stamped onto ivory card stock.  Going for a distressed look, I sponged the brushed corduroy along the edges, and used my Making Memories distress tool along the edges.
I finished with a Spellbinder's die and distressing, and some twill.  The cause ribbon at the top was created by rubbing my weathered wood stamp pad directly onto the twill (I cut the twill in half lengthwise to make it more narrow).

 
My friend, Arlene, bought one set, and I bought another.  We got together to stamp this weekend, and used each other's goodies and had so much fun.  I created this distressed version, and Arlene created an entirely different looking card with the same stamps! 
Do stop by Arlene's blog to check out her take with these awesome stamps.  You can find Arlene's blog
HERE  at SundayStamperPapercrafts.blogspot.com.

Blessings,

lynda

Tuesday, September 6, 2011

Technique Tuesday - Deep Marker Coloring

I'm baaaack!  Thanks for all the emails and concern about my welfare.  All is well, I just got a little overwhelmed with my new job, our home remodeling, the heat, a golf club to the forehead, and the kids moving week.  Whew, I'm reeling just thinking about it all! 

But, though I've been sporadic for a couple of weeks, rest assured, I'm here to stay!  And I'm missing my stamping and blogging BIG TIME!!  I am looking forward to this coming weekend to play with some of the new stamps and dies I purchased at the rubber stamp show here in Rochester last week. 

For this week's technique, I'm pulling out a card I did for a class a few years ago at the store.  This giraffe or any similar stamp is the perfect image for this deep coloring technique.  To begin, stamp image onto good quality white or light card stock.  Emboss with black.  For the giraffe, I chose a very light shade of tan Tombow marker, and "colored" the entire giraffe with the lightest color.  Working fairly quickly, I took the next darker shade, just a hint of brown, and added that shade, starting on the left side of the neck, face, and horns.  I used a Dove blending marker to blend the two colors together where they meet.  I continued on with the next darker color, and finally finished with the darkest shade of brown, using just a bit of it to show shading.  After each color was added I went in with the Dove blender and blended the line where the two colors met.
 TIP:  When finished coloring with markers, heat set slightly (not too much as you don't want to melt the embossing).  This will "set" the color so that it doesn't continue bleeding into the fibers of the paper, causing it to fade.That's it!!!  
Close-up of marker work
Easy-peasy, right?  The key is to not be afraid to use color and add the deep shades.  That is where you will get the contrast that makes your image "pop!"

See you next week with one of my new stamps and another technique!
Blessings,
lynda


Tuesday, August 16, 2011

Technique Tuesday - By The Seashore Card

I'm keeping it simple tonight.  It's hot and muggy, and I made this cute little fast and easy card because, well, it's fast and easy!!  And it's way too HOT to be up in my craft room.  Soooo, here it is....a summer card featuring the seashore.....
Just grab a couple of ink pads, some summery images, and stamp, then color in with your favorite markers.  Add some sparkle with glitter, and Voila!  An adorable card to commemorate the last few weeks of summer!

Blessings,

lynda