Check out the Prima Marketing blog for some exciting news coming soon! I don't know what it is yet, but here's a link to their blog: http://prima.typepad.com/prima/ .
They promise it's something BIG, so I will definitely be checking it out. There are lots of great page layouts on this blog, so check it out soon for some great ideas.
Blessings and peace,
lynda
Friday, February 26, 2010
Wednesday, February 24, 2010
Technique Tuesday - Embossing on Ribbon
Last week, Hero Arts blog featured ribbon and all the wonderful things you can do with it on cards and scrapbook pages. I especially liked the day they embossed on ribbon, so I thought I'd share it here with you. Just click on this link http://heroarts.com/blogs/club/2010/02/17/embossing-on-ribbonwith-a-video/ to read the article, see the samples, and even watch a how-to video with all the details on how you can emboss on your ribbons.
Here are a couple of the cards they highlighted on the blog:
 Happy Birthday card by Kelly Rasmussin
  Glad you're in my life card by Jennifer McGuire
Here are a couple of the cards they highlighted on the blog:
 Happy Birthday card by Kelly Rasmussin
  Glad you're in my life card by Jennifer McGuire
 I'm sure you will agree, these cards are stunning! I do hope you will check out the HA blog soon to find out how to do this, (be sure to watch the video) and try it for yourself.
I was packing last night and spaced it on the TT post for the blog!! Got so involved in what I am going to bring to the weekend crop I'm going to with my friend Karen that the evening just got away from me. Yep, just dreaming of two full days and nights of non-stop (or stopping whenever I want and re-starting whenever I want) scrapbooking and stamping! Woo-hoo! We're leaving 7:30 AM Friday, and coming home Sunday. Now hopefully the weather will cooperate!!
Hope you, too, have something fun planned for the weekend. At least carve out a little time for yourself to do some stamping, scrapping, or just playing!
Blessings and peace,
lynda
Tuesday, February 16, 2010
Custom Make Your Own Envelopes!
Have you ever made a card that wouldn't fit into any of the envelopes you have on hand? How about a very special card that just needs a very special envelope?
Well, it really is easy to make your own envelopes. You can, of course, use an envelope template. There are many to choose from, in all shapes and sizes. But, I think it's just as easy, if not easier, to make your own. I've been doing it for years, and teaching it at the store. No template, no pattern. The beauty is that no matter what size your card is, you can make an envelope to fit it.
I found this tutorial on lkeener's blog, which is exactly how I have been making mine. I am still a little techy-challenged, and lack the know-how to put together great tutorials, so I will link to her tutorial here on how to make an envelope of any size. Here's the link: http://scrapinator.blogspot.com/2009/03/easy-peasy-3-minute-envelope.html .
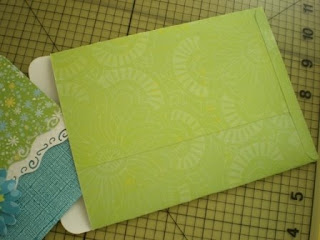
Use those odd pieces of paper that come in the paper packs, use maps, calendar pages, magazine pages, newspaper. patterned paper, stamped paper, even flower catalogs to make your envelopes. Now your envelope can match your card!
Hope you're keeping cozy and warm!
Blessings and peace,
lynda
Thursday, February 11, 2010
Shamrock
My non-Irish eyes were smiling as I made this card for a swap I'm in through the Hero Arts Flickr group. Just finished it and will be mailing it out today. Hope you enjoy it, and get inspired to start thinking GREEN!!!
If you like swaps, consider joining us next time. Just join the Hero Arts Flickr group and watch for Deborah Nolan's posts. Here is her website if you would like to check it out. She's witty, charming, creative, very, very talented, and just plain fun...hope you'll check out her site and play along next time http://dominodebi.typepad.com/sos/ .
Here's my card

OK, so now start THINKING GREEN!!
Hubby and I are off to Buffalo, where it's not so green right now....ever more snow than we have here in Rochester! Believe it or not! Faith and Dan are off for their honeymoon on a cruise to Jamaica, while we get to watch Keeley until Monday, when I have to go back to work in the afternoon! But she'll be in good hands with Dan's folks and lots of friends, too. Hope we don't have to do too much shoveling!! Just lots and lots of games, puzzles, hide and seek, coloring, stamping with Keeley, and fun! Maybe she and I will even bake some cookies, cuz Keeley says that
"Nana makes the BEST cookies EVER!"
With that, I'll bid you adieu!
Blessings and peace,
lynda
If you like swaps, consider joining us next time. Just join the Hero Arts Flickr group and watch for Deborah Nolan's posts. Here is her website if you would like to check it out. She's witty, charming, creative, very, very talented, and just plain fun...hope you'll check out her site and play along next time http://dominodebi.typepad.com/sos/ .
Here's my card

Hubby and I are off to Buffalo, where it's not so green right now....ever more snow than we have here in Rochester! Believe it or not! Faith and Dan are off for their honeymoon on a cruise to Jamaica, while we get to watch Keeley until Monday, when I have to go back to work in the afternoon! But she'll be in good hands with Dan's folks and lots of friends, too. Hope we don't have to do too much shoveling!! Just lots and lots of games, puzzles, hide and seek, coloring, stamping with Keeley, and fun! Maybe she and I will even bake some cookies, cuz Keeley says that
"Nana makes the BEST cookies EVER!"
With that, I'll bid you adieu!
Blessings and peace,
lynda
Tuesday, February 9, 2010
Technique Tuesday - Scrunchy Flowers

I saw this flower as I was looking for flower tutorials online, and really like the way it is slightly scrunchy, and so pretty. I found this tutorial on how to make them by Ilina Crouse on her blog here: http://ilinacrouse.blogspot.com/2010/01/scrunchy-fancy-flower-tutorial.html
It so pretty isn't it? I will be making lots of these, and trying different papers. Music sheets would be nice, or how about some pretty scrapbook papers, or your own hand-stamped papers. A large crystal would also be pretty in the center.
What a gorgeous embellishment for a card. How about three or more of them on a scrapbook page? Hmmm, with Valentine's Day coming right up, I'm thinking they would be pretty on a Valentine's card!
Try these, they're easy and fun to make, and I'm sure you find lots of uses for them!
Blessings and peace,
lynda
Friday, February 5, 2010
Sharing a challenge card
Thought I'd share a card I just finished up this afternoon for a challenge for Card Patterns weekly card sketch challenge here http://cardpatterns.blogspot.com/ . There are some fabulous card makers participating on this blog. Hope you will stop by there to check it out. Very inspirational.
This was the sketch....


This was the sketch....

And here is my "take" on the sketch, my finished card.....

I used Printworks stamps, and Basic Grey papers, and my new Fleur de lis die from Spellbinders. Check out the link above to see some of the awesome entries for this challenge, as well as their past challenges. Maybe you'll try one yourself soon!
Blessings,
lynda
Tuesday, February 2, 2010
Technique Tuesday - Glitter and Sticker Paper
I just love this season of Valentines. Hearts are everywhere....Valentine candy is plentiful....and sweethearts are planning their special Valentine's treats and activities.
As card makers, this is a really fun season to make cards and projects for. We get to use our pretty papers, heart shaped punches and dies, reds, pinks, and stamps with cute little critters with hearts and flowers. For me, making Valentine's cards means BLING! Out comes my glitter and shimmery paints and pens, glitter glue, and crystals. Valentines and glitter just GO together!!
I had so much fun making this card, using my heart punch, vellum, glitter, and sticker paper:

Hope you're enjoying this season of love!
Blessings and peace,
lynda
As card makers, this is a really fun season to make cards and projects for. We get to use our pretty papers, heart shaped punches and dies, reds, pinks, and stamps with cute little critters with hearts and flowers. For me, making Valentine's cards means BLING! Out comes my glitter and shimmery paints and pens, glitter glue, and crystals. Valentines and glitter just GO together!!
I had so much fun making this card, using my heart punch, vellum, glitter, and sticker paper:

Here's how I did it:
- Trim vellum with scallop blade on paper trimmer. Use glue pen to trace hearts, then sprinkle with glitter. Add to card front when dry.
- Punch double hearts in center of red cardstock scrap. Align smaller square scallop punch or die cut and punch out square with hearts in center. Set aside.
- Adhere double-sticker paper to white cardstock scraps. Punch out larger square with square scallop punch or die cut.
- Peel protective paper from the white square, revealing sticky surface. Adhere red punched square with hearts onto white square. The heart openings and outside border will be sticky.
- Dip pieces into multi ultra-fine glitter. The glitter will stick to the hearts and border where the sticky paper is!
- Assemble card.

Hope you're enjoying this season of love!
Blessings and peace,
lynda
Tuesday, January 26, 2010
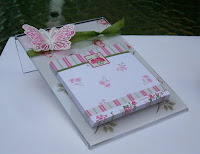
Pocket Cards
I just love the look of pockets on cards. I often use them on my scrapbook pages, but don't think about them for cards. This Hero Arts Technique article by Shari Carroll gives directions on how to make these three fabulous cards with pockets. I know what I'm doing the rest of this week!
Here's the link to the article with directions and pictures:
http://www.heroarts.com/learning/technique.cfm?techID=54&catID=3


Here's the link to the article with directions and pictures:
http://www.heroarts.com/learning/technique.cfm?techID=54&catID=3


Thanks to Shari Carroll for these wonderful pocket cards. And thanks to Hero Arts for always providing lots and lots of inspiration. Be sure to check out the Hero Blog for more ideas and fun.
Blessings and peace,
lynda
Thursday, January 21, 2010
Challenge Entry
Thought I'd share this layout I just finished for a challenge over on My Mind's Eye blog, using one of their sketches. This paper is from their Wild Asparagus paper pad.


Wish me luck!
lynda
Lotsa Layers!
I had soooo much fun with this collection by My Mind's Eye! These papers are from the Be Loved Collection, and I just love, love, love the colors. I purchased it at Stop and Scrap online, and couldn't wait for it to arrive. It came just last week, and I had to dive right in and make a card for the Hero Arts Hearts and Friendship challenge on their blog. Here's my entry:

Here's the inside (I didn't add the sentiment yet, as I don't know what occasion I want to use it for).....

I had lots of fun with this line, and can't wait to do more with it. Now I'm hopping over to Hero Arts blog. Hope you enjoyed this card!
Blessings and peace,
lynda

Here's how I made it:
- Cut four different papers into various width strips and adhere to ivory card front. Distress edges with Ranger Brush Corduroy Distress Ink.
- Cut, round corners, distress, and adhere green panel. Add striped strip from edge of card to about 2" in.
- Cut, round corners, distress, pierce around edge, and adhere rust panel.
- Cut, round corners, distress, adhere flowers and brads, and adhere teal hears strip near bottom.
- Stamp Hero Arts CL012 image with ColorBox chalk ink onto peach cardstock panel made with Spellbinders die. Distress edges and adhere to card with foam mounting tape. Stamp image again, and cut out flower head and attach over original with foam tape. Add highlights with clear Stardust gel pen.
- Stamp Hero Arts K4913 lots of love, cut out, and adhere with foam tape over image. Add teal knotted ribbon with glue dots.
- Add flowers and gem on left side with glue dots.
Here's the inside (I didn't add the sentiment yet, as I don't know what occasion I want to use it for).....

Blessings and peace,
lynda
Tuesday, January 19, 2010
Technique Tuesday - Paper Piecing
Paper piecing is one of those fun and easy techniques that really makes an image "pop" on your card. It's as easy as stamping an image onto patterned paper, cutting it out, and attaching the cut out portion over the stamped image on your card. This link brings you to the Hero Arts blog where Sheri Carroll walks us through, step by step, how to do this technique. I love her card, and know you will, too. Think of all the open design stamps you have and how fun it would be to use this technique with them!
Here's the link to the paper piecing technique by Shari Carroll:
http://heroarts.com/cardmaking/cardIdea.cfm?cardID=4233
Here's the card Shari made:

I love the simplicity of this, and the great paper designs she chose! I hope you'll check out this blog posting on Hero Arts, and leave Shari a comment.
Also, if you haven't signed up for the Hero Arts Club, be sure to sign up while you're there. They have so many ideas and so much inspiration there, each and every day!!
Hope you're enjoying our balmy temperatures this week! I, personally, think snow is highly over-rated!
Blessings and peace,
lynda
Here's the link to the paper piecing technique by Shari Carroll:
http://heroarts.com/cardmaking/cardIdea.cfm?cardID=4233
Here's the card Shari made:

Also, if you haven't signed up for the Hero Arts Club, be sure to sign up while you're there. They have so many ideas and so much inspiration there, each and every day!!
Hope you're enjoying our balmy temperatures this week! I, personally, think snow is highly over-rated!
Blessings and peace,
lynda
Tuesday, January 12, 2010
Three Boutique Gifts for $1 Each - REALLY!!
Sad to say, I got NO takers on last week's blog challenge. Too bad, cuz I had some really pretty blog candy to give away. Maybe I'll try again in a few weeks.
This week, I'm going to show you three gifts I made for my good friend, Sylvia. Normally, I don't brag about how much I spend on someone's gift, but you just won't believe what this pretty gift set trio cost. Here are the items:


This week, I'm going to show you three gifts I made for my good friend, Sylvia. Normally, I don't brag about how much I spend on someone's gift, but you just won't believe what this pretty gift set trio cost. Here are the items:

This pretty frame...... just $1!!!!!

This gratitude journal.......just $1

And this candle......yep, just $1!!!!!!
The secret? The Dollar Store! Yes, I bought a plain, kind of ugly, wooden frame, a top-spiral hard covered lined notebook, and a plain blue candle. I took them home, selected papers and embellishments from my stash in colors that would match Sylvia's bedroom, and simply covered each piece. I had the wonderful buttons from a tin of buttons and findings I picked up at a garage sale this summer. All three pieces took just three 12 x 12 pieces of decorative cardstock!!
Here's how it's done:
Frame: Sand frame so that paper will stick easier. Paint inside and outside edges with blue acrylic paint, let dry. Trim decorative cardstock paper to size of frame (trace frame onto back of cardstock - make sure to trace inside opening, then cut out). Adhere paper to frame with good glue. I used Perfect Paper Adhesive. Or you can use bookbinding glue, as well. From coordinating cardstock, I cut out the paisley shapes, and adhered to covered frame. Distress inside and outside edges of paper with brown distress ink on a piece of Cut n' Dry. Line inside of frame with coordinating plain cardstock. This is where the picture will go. Add buttons and flower embellishments with glue dots.
Gratitude Journal: Remove plastic spiral binding by twirling it out of the holes. Set aside. Sand notebook if it is glossy, as this one was. I chose to paint the outside edges of the covers, but you could also wrap the paper into the inside. Apply cardstock (striped on bottom, star design on top); apply small strip of cardstock between the two panels. Distress edges. Use small 1/8" paper punch to punch the holes through the cardstock. Do this from the back, aligning the punch with the holes in the notebook. Adhere panel 1/8" smaller all around the the inside cover of the front. Repeat for back covers. I used the coordinating paisley cardstock for the back cover. Stamp "gratitude" on brown panel, mount onto blue scrap, adhere to cover. Add buttons and flowers with glue dots. Rewind the spiral binding back onto the covers and pages. Tie coordinating ribbons and fibers to binding.
For more information about gratitude journals, including how to use them, see my article on HubPages here http://hubpages.com/_quhng16s2trb/hub/-Journaling-About-Gratitude-Changed-My-Life .
Candle: Cut decorative cardstock (striped) size of candle and circumference plus 1". Wrap around candle and adhere by overlapping the piece and attaching with tape runner. Cut second piece (paisley) a little more narrow that first piece and adhere as above. Distress edges. Add ribbon and tie bow. Add buttons and flowers with glue dots.
That's it!!! A pretty little gift set which looks like it came from an artsy boutique, for a fraction of the cost. Just an investment of your time. But you won't even mind spending the time....it's so much fun making something pretty from something plain!
Ciao! Peace and blessings,
lynda
Tuesday, January 5, 2010
Technique Tuesday - Pastel Chalk Resist
HAPPY NEW YEAR to all of my wonderful friends, fans, readers, followers, fellow bloggers, fellow stampers, well, everyone!


I'm enjoying a day off. I love mid-week days off, and usually plan my trips (doctors, shopping, visiting, errands) for this day, but as I looked out the window this morning and saw the winter wonderland scene, I thought it would be a perfect day for staying in! I don't have to don boots, gloves, hat, etc. and no shoveling or scraping.
Be sure to check read this whole post, as there is a BLOG CHALLENGE after the technique, and you just could win a prize!!!!
So, now that I have my hot chocolate, it's time for today's Technique Tuesday technique.
Last week I did a chalk ink resist technique. Many people get confused when we talk about chalks. For this post, I will be using pastel chalks, the kind that come in little palettes or stick form - in other words, actual chalk. Chalk INK, on the other hand, is ink that is formulated to look like chalk when it dries. That is what I used on last week's post. Now that I have that cleared up, let's move along.
Pastel Chalk Resist

This is a card I made for a stamp camp at The Paper Garden in 2008. Here's how the technique is done:
- Start with a card stock panel. Ink panel with VersaMark clear ink pad, using stamp images of your choice. For this card, I used Hero Arts Winter's Butterfly set of clear stamps.
- Be sure to let the ink dry a minute or two - DO NOT RUSH THIS. If you apply the chalk while the ink is too wet, it will smear. Take your time.
- Using an alligator clip with piece of cotton or pom pom, or sponge applicators made for chalks, apply color to the stamped images. Use different applicator for each color. In this card, I used light, medium, and dark blue chalks. This is the exciting step, as you will see the images "pop" out, right before your eyes!
- Use a soft tissue to gently wipe the card front to remove any extra chalk particles. You will not remove the smudges around the images....that adds to the charm of the technique, and gives your images a soft glow.
- Finish panel as desired. In this card, I added some stamped snow flakes with blue Marvy Matchable ink. Then I drew over some of the design with the white Signo gel pen, to break up all the blue a little, and add some interest.
- TIPS: Again, be sure to let the ink dry a bit before applying chalk. If desired, you may spray your panel with a fixative, or aerosol hair spray. It shouldn't be necessary, but some people like to add this step.
Here is the inside of the card:

I hope you enjoyed this technique. I use this a lot, as I like the soft, smudgy look.
Blog Challenge: If you try this, let me know.
*If you post your card on Flickr, and send me the link, I'll post it on my blog this week for everyone to enjoy. I'd love to see what you do with this.
*BE SURE TO LABEL YOUR CARD PaperArtsCafe Blog Challenge # 1.
*Also, be sure to leave a message on this post, and send me an email at keeleysgram@yahoo.com to let me know you're playing, and that you posted your card on Flickr, along with your link, and your mailing address in case you are the winner!
*Send me your card link by NOON Sunday, January 10th. I will choose one card, and the artist will win some BLOG CANDY! If you are not familiar with blog lingo, blog candy is goodies that stampers and scrap bookers like....a little prize. No fat, no calories, but yummy goodies to use on your next project. I will send the winner of this challenge a Colorbok Christmas Mini Scrapbook Kit (hey, you can get an early start for next year). If you are not a scrap booker, don't worry. There are plenty of papers and embellishments for card makers in this package.
So get busy. You have until Sunday NOON to post your images and send me the link.
*Be sure to send me your name and address, so I know who and where to send the blog candy to. I will post all the entries on Monday, January 11th, and will announce the winner of the blog candy.
So check Monday's post, and come back often for more fun "blog stuff" on PaperArtsCafe! (Don't forget, if you don't want to miss a post, sign up to follow me on the blog site). This is my first blog challenge, and I hope you will participate. I look forward to seeing your cards!
Happy stamping and scrapping!
Blessings, joy, and peace,
lynda
Tuesday, December 29, 2009
IR-RESIST-ABLE

 Start by embossing the image (in this instance, the row of flowers) with clear pigment ink. I used VersaMark clear ink on white cardstock. Apply clear embossing powder and heat until fully embossed.
 Next, begin applying ColorBox Chalk ink to the embossed strip, starting with the lightest color and working up to the darkest color. I used the Chalk ink Queue (Cat's eye shaped pads) in graduated colors of pinks and deep burgundy.

That's it. Once you have your piece inked and buffed, you can use it on a card, scrapbook page, or any paper crafts project. Here is the card assembly for the card I made with my strip:
-Prepare strip using the above method
-Emboss dot background with VersaMark and clear embossing powder on tan cardstock. Round corners.
-Stamp scalloped border on pink cardstock, attach to prepared (above) strip. Attach to tan piece as shown. Tie ribbon at seam. Attach piece to brown card.
-Stamp For You scalloped circle and attach with foam tape to circle (punch or die cut circle). Attach to card slightly overlapping strip.
-Stamp graduated dolls and apply to card. Use foam tape on medium and small doll.
That's it! Easy, peasy! And fun to do.
Stamps by Hero Arts: S1583 Dot Background, CL045 Flower Border (clear set), CL289 Dolls and scalloped border, and For you circle (clear set).
Blessings,
lynda
-
Tuesday, December 22, 2009
Merry Christmas!!
It's time for Technique Tuesday, and I'm still trying to get my Christmas decorating, shopping, baking, cards, and wrapping done!! Christmas is three days away, and I'm nowhere near done. But, I have decided I'm NOT going to stress about it. I had a most wonderful month, celebrating my daughter and son-in-law's wedding, am blessed with a loving husband, a beautiful, lively and delightful granddaughter, and a family and friends I adore. What more is there, really, when you come right down to it?!
The lights are on the tree, the decorations will go up tonight, most of the gifts are at least purchased, and if I don't get to cookies, oh well. Don't need the cholesterol anyways! We are going to Buffalo on Thursday afternoon, to spend the evening with the kids and Keeley, go to Mass with them, and be there on Christmas morning to watch Keeley open her Santa gifts. After brunch with the kids, we'll come home Christmas afternoon and spend the afternoon and evening at Dan's mom's, with his brothers and sister.
We're hoping to get together with some friends on Saturday, if our schedules all cooperate, and maybe get to spend a day just to ourselves on Sunday!

As time seems to have gotten away from me, my Technique Tuesday posting this week is my Christmas card for this year. I wish you, and yours, a very, very Merry Christmas, and a New Year of blessings!
Peace,
lynda
Wednesday, December 16, 2009
Technique Tuesday - Money holder cards
I know, I know. I'm a day late with my Technique Tuesday. You have to remember, I have had NO Christmas preparations done, as my whole focus these past couple of months has been the big wedding. Now that it's over, and I've had a little time to recouperate, I have been getting down to the business of Christmas. You have to understand, Christmas at our house is a BIG DEAL. I LOVE Christmas. I love everything about it. The decorating, the baking, the tree, the songs, the joyful spirit of most folks. We usually get things kicked off on Thanksgiving afternoon, when the kids come in and help us decorate our tree, then I putz with the rest during the following week. So, imagine my distress at having NO Christmas decorations, tree, or anything in sight here until this week!! I have been scrambling to get it all done, and still have LOTS to do, but need to get this post on the blog.

I love this project which is on the Hero Arts Club Blog. There are directions, and a video, on how to make these cards, which each hold money. If you are giving money as a gift, these cards are sure to bring a smile to the recipients' faces! What unique ideas. Here are a couple of the cards. Check out the blog http://heroarts.com/blogs/club/2009/12/16/who-said-money-doesnt-grow-on-trees/ for detailed directions and video.

I trust you are enjoying your holiday preparations. I looked out the window a few moments ago, and it's snowing very heavily here right now, and it looks so pretty. Yes, we are going to have a white Christmas.
Thanks for all your good wishes for my daughter, Faith, and her husband, Dan, and Keeley. They are doing great, and love being Mr. & Mrs.
Blessings and peace to you.
lynda
Saturday, December 12, 2009
Wedding Accessories
I know, I promised some pics of the wedding accessories I made for my daughter, Faith's, wedding last week. I'm finally back down on the ground, and enjoying a lovely Saturday at home, NOT making wedding things for the first time in a loooooong time. But, I have to say, I loved every minute of it!
So, here goes. Can't figure out this spacing thing....It looked good when I typed it, but when I pressed publish, all this spacing happened, and I don't know how to fix it.....so you need to scroll down a lot to see all the pictures...just keep scrolling to the very end. There are nine pictures, then a final paragraph. First, there were the shower invitations:
Our Rochester shower:


Faith and me at Buffalo shower
Shower favors

Card box for wedding - poor picture, black satin and velvet flocking, flowers and feathers on top, with slot in front for inserting cards. Thinking of going on Etsy to sell my card boxes and garters....by encouragement and "pushing" from said daughter....


So, here goes. Can't figure out this spacing thing....It looked good when I typed it, but when I pressed publish, all this spacing happened, and I don't know how to fix it.....so you need to scroll down a lot to see all the pictures...just keep scrolling to the very end. There are nine pictures, then a final paragraph. First, there were the shower invitations:
Our Rochester shower:


Faith and me at Buffalo shower
Shower favors


Card box for wedding - poor picture, black satin and velvet flocking, flowers and feathers on top, with slot in front for inserting cards. Thinking of going on Etsy to sell my card boxes and garters....by encouragement and "pushing" from said daughter....

the garter le elegance....

Oh, and one last picture....Faith in her dress on the day she bought it....BEFORE the wedding...stay tuned for actual wedding pictures FROM the wedding...to be posted when they are available. She had some alterations made on the dress, which was gorgeous to start with....but made it even more "Faith-like" when done, and just stunning. I think she was a stunning, gorgeous, and radiant bride....but then, I'm the mom! They made such a perfect couple....and everything was so fun, so gorgeous, and so THEM!


Well, that's it for this post. As I said, I will post a link to pictures from the wedding as they become available. You really have to see the alterations to this dress.
Thanks for bearing with me these past few weeks. NOW, I really need to get some Christmas decorating done, not to mention cards to make!!!!!
Joy and blessings,
lynda
Tuesday, December 8, 2009
 Today was a busy day, with a dental cleaning at 8 AM, Prayer Shawl Group from 10 until noon, then a tea party at my friend, Sylvia's. I just sat down after dinner to check my emails, etc. from the weekend away (yesterday I went to bed shortly after work, catching up from all the partying), and thought about Technique Tuesday. I'm making it easy on myself again this week, with this adorable card purse I found on Split Coast Stampers site. It is a set of note cards and envelopes inside a sweet card purse, and is a creation of Jodi Collins. I thought it was just so sweet, and just in time for holiday gift giving. Who couldn't use a few cards for sending out quick notes or thank you notes, especially this time of year. What a thoughtful and perfect gift to make and give. The directions are very clear, with pictures, and even a video, so you can see step by step how this is constructed. I was thinking of all the occasions I would like to make these for....birthdays, Easter, even favors for a small party, and, of course, Christmas. I know you will enjoy making some of these. Here is the link to the tutorial with full directions by Jodi:
I survived my daughter's wedding Saturday, and am home enjoying the relative quiet and stress-free environment until the next big event! It was an absolutely beautiful wedding, and Faith made a radiant bride, and Dan a very handsome groom. We had so much fun, and enjoyed every moment. It just ended too soon after all those preparations. It seemed like a fairy tale that I didn't want to end! I will post some pictures when they become available. I posted the picture of the card box and garter that I made on my Flicker stream, and you can click on it to take you there (scroll down until you see my Flicker stream on the right). I did notice some wedding pictures on Facebook, so if you look on my Facebook page, you can see what some of the girls have posted there. Everyone was commenting how lovely everything was, and what a great time they all had.
I think it's going to take me a few days to catch up on the sleep I missed Saturday night from all the partying (can't handle it like I used to), but it was so worth it.
I will be back into the swing of things soon, and posting more often now that the wedding is over. Now I have to start thinking Christmas!!!!! I'm so far behind. I know what I'll be doing this weekend!!
lynda
Tuesday, December 1, 2009
Technique Tuesday - Photo Tags
OK, so I'm making my blog posting easy on myself this week, as I can't seem to focus on much else but the wedding at this point. Only four more days!!!!

So, today's blog post is about gift tags....more specifically, photo gift tags. They are featured on today's Hero Arts blog, and they are just fabulous. And, just in time for Christmas gift wrapping. I will definitely be making some of these (after the wedding). They are charming, pretty, and look easy to make. Here's the link to the Hero Arts blog and the posting about these awesome gift tags:
http://heroarts.com/blogs/club/2009/12/01/picture-perfect-tags-plus-giveaway/
 I've included some of the pictures here on my blog, but there are more on the Hero Arts blog, along with directions. And, be sure to sign up for the drawing for a free set of Hero Arts stamps while you are there. It's free to sign up, and you just might win! That's it for today. I hope you enjoy the Hero blog with the tags. There is more coming in their blog tomorrow....more tags and ideas, so be sure to go back. Better yet, if you haven't signed up yet, sign up for the Hero Arts blog. You will be notified when they post each time. There are some great ideas there, and every week there are giveaways, and a challenge each week. Very inspirational!
I'll be back on my blog after the wedding Saturday, and hope to post before Tuesday. But, if I don't get to it, I will be back with Technique Tuesday next week.
Enjoy your week!
Blessings,
lynda
Tuesday, November 24, 2009
Technique Tuesday - Embossing With Wet Watercolor
This is a technique I use often, as I love the soft, muted look of the watercolor with the embossed images. Unlike detailed watercoloring, this wet watercolor technique is fast, and very freeing. It calls for a very relaxed approach. The thing is, this technique is very addictive. Once you make one, you will want to paint all of your images this way. It works especially well on large images, as you will see by the cards below. Here's how it is done: (CLICK ON IMAGES TO VIEW LARGER)
- Emboss the image on watercolor paper, or good quality cardstock. I usually use white, so the colors will be true.
- Use a waterbrush (a tool that has a barrel that holds water, with a brush on the end), or a watercolor brush. Dip the brush in water, and "paint" the image with clear water first. Your brush should be wet, but not dripping. Practice this for a while to get a feel for how much water to use.
- Dab your damp brush into the first color of watercolor paint. Rub the brush around in the color until the brush has plenty of pigment on it. Bring this loaded brush to a palette and roll the brush around, depositing the color onto the palette. Add water with the brush, a little at a time. I usually add water, then bring some of the mixture to another spot on the palette, and dilute this area even more.
- With the most diluted puddle that you just made, paint the first color onto your image. Because you have prepared your surface, the color should just feather out when you brush it on. The embossing acts as a block to keep the color inside the image.
- Using a stronger part of the mixture you made, add more color to parts of the areas you just painted. When you add this stronger, or darker, hue, it will fade softly into the lighter hue that you previously painted, creating an automatic shading.
- Repeat with the other colors you will use in your image.


Tips: *If you put too much color and want to lighten it, just dab with a paper towel. *Don't overwork with the brush, as eventually the paper will "pill" and/or warp. *After the image is dry, place under something heavy to straighten it if it is warped. *If you are cutting out the image to mount onto another background (as in the butterfly card), be sure to cut just outside the embossing, so the embossed edge does not chip. *Practice, practice, practice - you will get it. *No need to invest in expensive, professional watercolors - a mid-quality palette of 12 to 24 colors will be fine. *You will get best results with watercolor paper. Some of the watercolor papers have a semi-smooth nap, so your images will emboss nicely. *Keep relaxed, and don't overthink or overwork your painting. Let the colors flow and blend into each other.
- - - - - - - - -
May you enjoy the blessings of family and friends this Thanksgiving, and may you be mindful of the many riches we enjoy each day.
Joyfully,
lynda
Subscribe to:
Posts (Atom)