It's my turn to post on the Technique Junkies blog today, and I decided to create a card on kraft card stock.
Stamps: Flourished Florals
In My Prayers
Full details, including stamps used and my techniques, are on my TJ blog post HERE. I hope you will stop over and check it out.
I am adding my card to these challenges today:
Little Red Wagon - Much ado about nothing (no occasion)
Modsquad Challenge - Use a flower
Simon Says Stamp Wednesday Challenge - Anything goes
Watercooler Wednesday - All About Occasions
Thanks for stopping by today. I hope you found some inspiration here.
Be sure to come back tomorrow for the Technique Junkies July release celebration, and for Day 1 of the Impression-Obsession Fall/Winter Stamp Release Celebration! Lots of excitement for July!!
Blessings,

It's Old Is New time once again at the Impression-Obsession blog! All of the designers are sharing projects we have made using older IO (and Serendipity) stamps. You can see the other designer's blog links on the IO blog HERE.
I was delighted when Mitra decided to take on the Serendipity line, and I simply had to have this ballet one, to make a card for my eldest granddaughter, our dancer!
Stamps: On Point SS1054-F
Cover-A-Card Music CC029
Hummingbird WP937
I stamped the On Point stamp onto bristol vellum, using VersaFine Claire Nocturne ink, and let it dry.
 I colored the image with Faber Castell soft pastels, using a twice-folded cotton makeup remover square, and q-tips to apply the color. I also added some color to the bottom right corner, using the folded makeup remover square.
I layered the panel onto a teal card stock panel, then onto a panel onto which I had stamped the Cover-A-Card Music stamp, with distress ink. I added the whole shebang to an A2 card front, and stamped the verse, which is from the Hummingbird WP937 clear set.
I kept my card simple for a couple of CAS challenges. No embellishments. I really had to refrain, which is hard for me!
And for the inside:
I hope you are inspired by my card. And I hope my Keeley likes it! She's going to a dance competition over the 4th, so she's been working really hard, perfecting her dance moves.
Don't forget to check out the other designer's cards HERE.
I colored the image with Faber Castell soft pastels, using a twice-folded cotton makeup remover square, and q-tips to apply the color. I also added some color to the bottom right corner, using the folded makeup remover square.
I layered the panel onto a teal card stock panel, then onto a panel onto which I had stamped the Cover-A-Card Music stamp, with distress ink. I added the whole shebang to an A2 card front, and stamped the verse, which is from the Hummingbird WP937 clear set.
I kept my card simple for a couple of CAS challenges. No embellishments. I really had to refrain, which is hard for me!
And for the inside:
I hope you are inspired by my card. And I hope my Keeley likes it! She's going to a dance competition over the 4th, so she's been working really hard, perfecting her dance moves.
Don't forget to check out the other designer's cards HERE.
 I am adding my card to these challenges:
Addicted To Stamps - Anything goes
Allsorts Challenge - Soft Pastels
Tuesday Throwdown - Keep it simple
AAA Cards - One corner Optional flowers
Color Throwdown - Colors
Thank you for visiting my blog today. I appreciate your visits and comments.
Blessings,
I am adding my card to these challenges:
Addicted To Stamps - Anything goes
Allsorts Challenge - Soft Pastels
Tuesday Throwdown - Keep it simple
AAA Cards - One corner Optional flowers
Color Throwdown - Colors
Thank you for visiting my blog today. I appreciate your visits and comments.
Blessings,
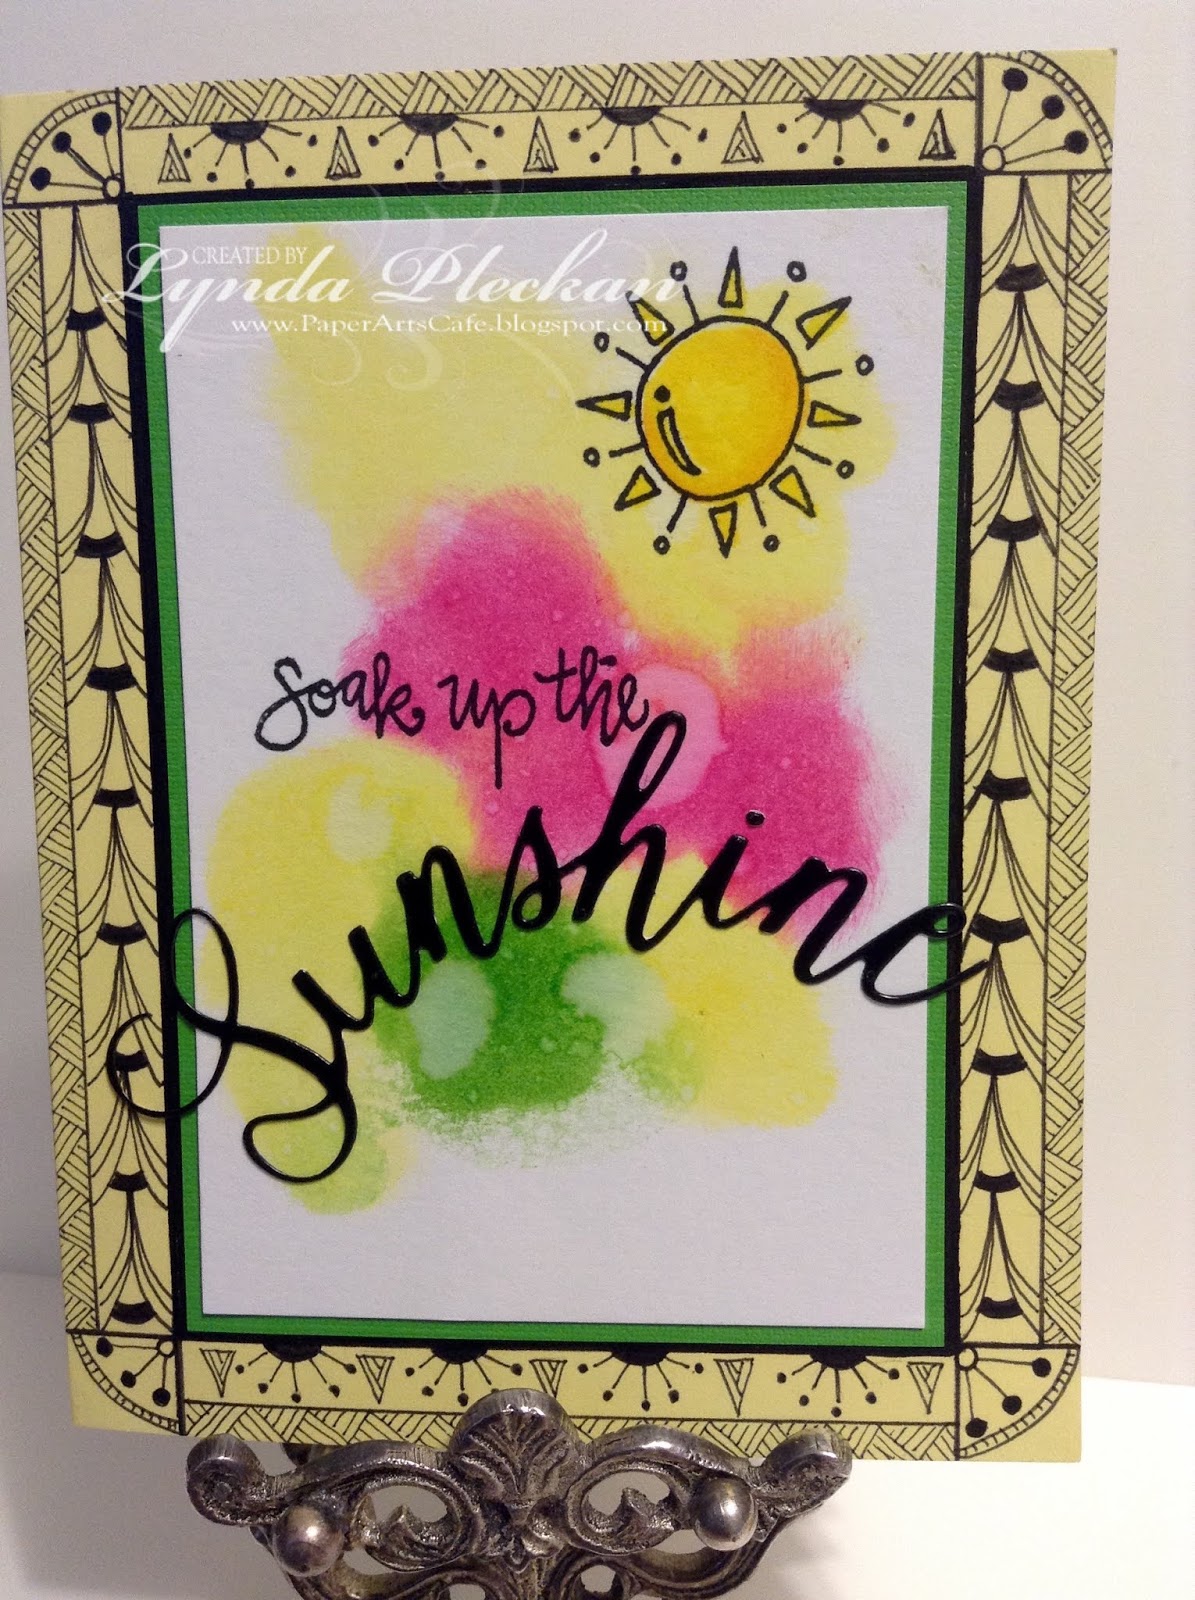
Welcome to the Impression-Obsession 'Sending Sunshine' challenge! You can find links to all the designer's posts, as well as details about the challenge, on the Impression-Obsession blog HERE.
I brought the sunshine with my card today....
Stamps: Summer Vibes CL956
Dies: DIE373-E Sunshine
 I created my background by adding some distress inks to watercolor paper with ink applicator sponges. I then added some large droplets of water, and some spatters, and dried the panel.
I stamped the 'soak up the' verse from the Summer Vibes set (leaving off the sun word), the sun from the same set, and added the Sunshine die. I layered it up and added it to a yellow A2 card front.
For the border, I hand drew some Zentangle patterns along the outside edges.
I created my background by adding some distress inks to watercolor paper with ink applicator sponges. I then added some large droplets of water, and some spatters, and dried the panel.
I stamped the 'soak up the' verse from the Summer Vibes set (leaving off the sun word), the sun from the same set, and added the Sunshine die. I layered it up and added it to a yellow A2 card front.
For the border, I hand drew some Zentangle patterns along the outside edges.
Inside: I hand drew some circles, and colored it with distress inks, adding the verse from the same set as above.
Come on over and join us in the fun. You have until July 9th to enter the challenge. The prize is a $25 gift certificate to the IO store!
I am adding my card to these challenges today:
Addicted To Stamps - Anything goes
Dies R Us - Summertime
Little Red Wagon - Summer fun
Simon Says Wednesday - Vacation
Thanks so much for visiting today. Hope to see you over at the IO blog with your challenge card!
Blessings,
Hello lovely peeps! Just stopping in with a quick post today. I challenged myself to make a CAS card, and keep it to black and white only. I'm a color-lover, and like embellishing, etc., so this is difficult for me. But...here goes..
I used three Technique Junkies stamps in my card:
Kitty Duo
Faith In Your Dreams (inside)
Never Stop Making Wishes
It's pretty self-explanatory, so no need for directions here. I used my favorite black ink, VersaFine Claire Nocturne.
And here's the inside:
I am adding my card to these challenges:
Time Out Challenges - Nature
Allsorts Challenge - Travel (by wind)
Originally, I had made this card for the AAA Challenge, but when I went to join it, I saw that it was supposed to be only one layer with black and white! Guess I'd better read the requirements a little more closely! But....the INSIDE is one layer, right? Hmmmm.
Well, that's it for today. Hope you enjoyed my attempt at CAS.
If you like these stamps, you can get them, and your entire order, at the Technique Junkies store for 10% off by using my code, TJ10Lynda.
Thanks for visiting.
Blessings,
Welcome to Die-Cut Obsession at Impression-Obsession! Today we are featuring some of our fabulous dies on our design team blogs for your inspiration. You can find the other designer's post links on the IO blog HERE.
I love dragonflies, so my card today has a great big one....
Dies: DIE43-YY Dragonfly & Cattails
DIE814-U Pinked Stitched Sentiment Banners
Stamp: Little Things C20696
 I created a background on watercolor paper using distress inks and watercolor. I cut the Dragonfly & Cattails die from blue card stock, and adhered it to the background, then adhered that to a teal panel, then to an A2 card. I added some sparkle with the Spectrum Noir clear glitter pen. It doesn't show up well in the photo, but in real life it's fabulously sparkly!
I created a banner from one of the Pinked Stitched Sentiment Banners, and stamped the Little Things verse onto it, and adhered it with foam tape.
Inside:
I hope you are inspired by my card. Dies are fantastic for making a quick card. I often make a bunch of backgrounds when I have my inks and sprays, etc. out. That way, when I want a card, I just grab one, add a die, or stamp something over it, and Voila! Instant card! Especially these large frame dies, like this beautiful dragonfly one. Easy-peasy!
Ooopss.... Did anyone catch my ooops on my card. I inadvertently stamped the verse on the wrong side of the die cut. I just noticed it when I had the card all finished. The stitches really look neater and more crisp on the right side....but the card was finished, so there was no going back.
Don't forget to check out the inspiration from the other designers HERE.
I am adding my card to these challenges:
CAS Watercolor Challenge - Something blue
Dies R Us - Summertime
Time Out Challenges - Nature
I created a background on watercolor paper using distress inks and watercolor. I cut the Dragonfly & Cattails die from blue card stock, and adhered it to the background, then adhered that to a teal panel, then to an A2 card. I added some sparkle with the Spectrum Noir clear glitter pen. It doesn't show up well in the photo, but in real life it's fabulously sparkly!
I created a banner from one of the Pinked Stitched Sentiment Banners, and stamped the Little Things verse onto it, and adhered it with foam tape.
Inside:
I hope you are inspired by my card. Dies are fantastic for making a quick card. I often make a bunch of backgrounds when I have my inks and sprays, etc. out. That way, when I want a card, I just grab one, add a die, or stamp something over it, and Voila! Instant card! Especially these large frame dies, like this beautiful dragonfly one. Easy-peasy!
Ooopss.... Did anyone catch my ooops on my card. I inadvertently stamped the verse on the wrong side of the die cut. I just noticed it when I had the card all finished. The stitches really look neater and more crisp on the right side....but the card was finished, so there was no going back.
Don't forget to check out the inspiration from the other designers HERE.
I am adding my card to these challenges:
CAS Watercolor Challenge - Something blue
Dies R Us - Summertime
Time Out Challenges - Nature
Thanks so much for stopping by. I appreciate your visits and your comments.
Blessings,